How to Create a Tech Pack: A Visual 7-Step Guide
To create a tech pack, bring your product references, technical drawings, measurements, materials and construction instructions into one document. The Adstronaut AI tech pack generator creates that document from your garment photos, then lets you refine the details and export it for your manufacturer. Here's what the process looks like for one navy utility overshirt.
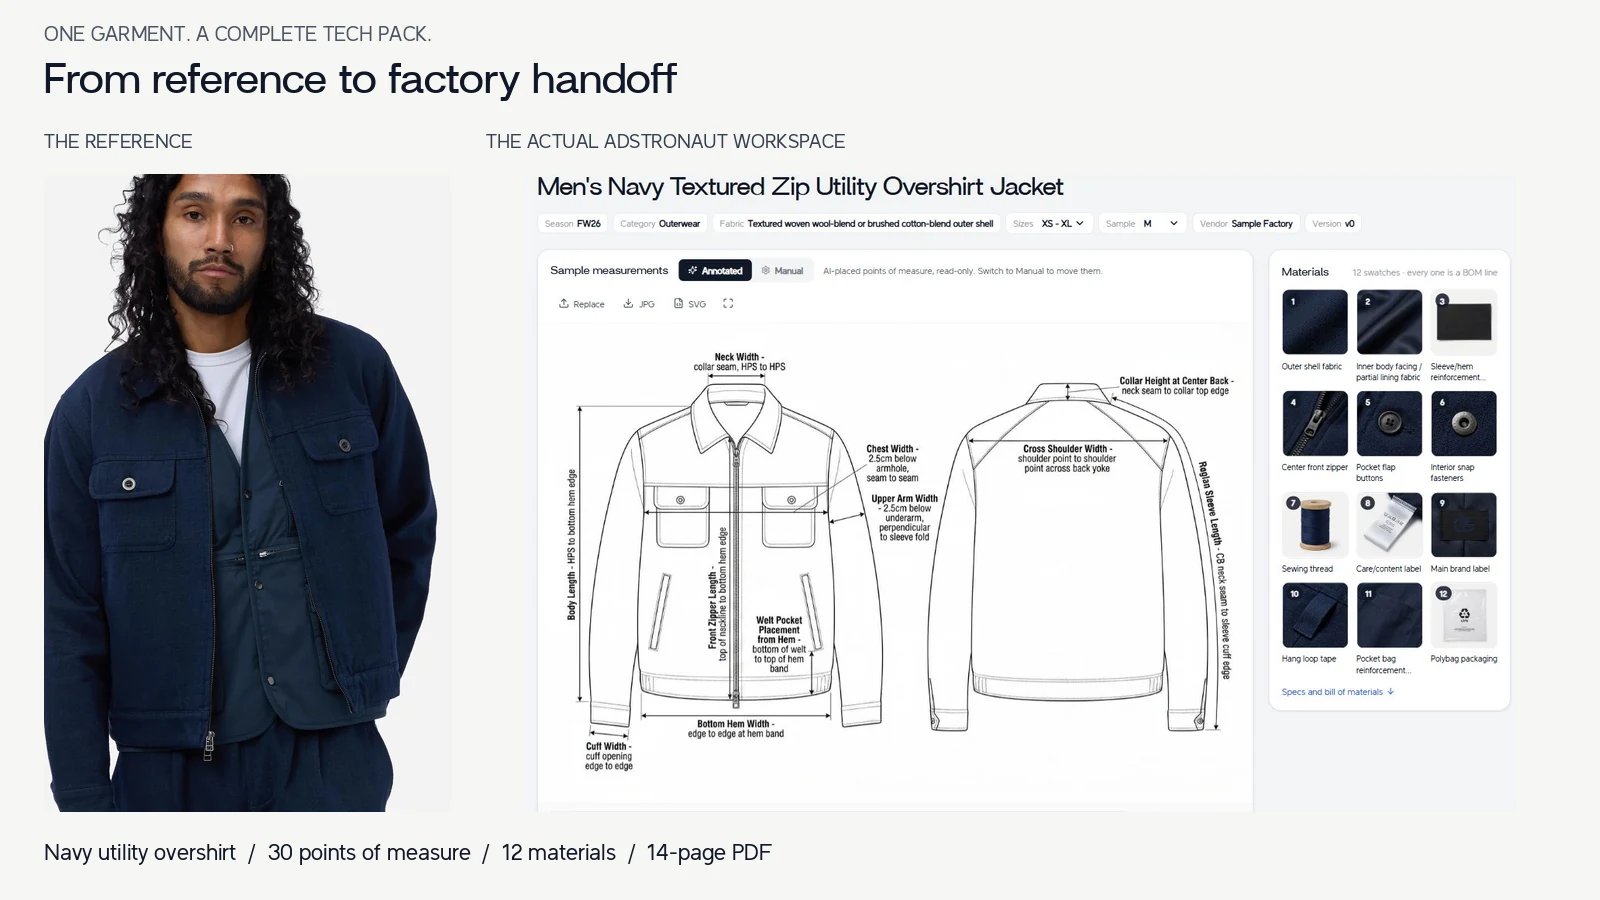
One garment throughout: two reference photos, 30 points of measure, 12 materials and a 14-page export. The screenshots show an existing pack in Adstronaut's current interface. Click any image to open it full size.
Open this overshirt's complete PDF · Get the free Excel/PDF measurement template
Create a tech pack for your own garment →
In this walkthrough
- 1. Start with useful reference photos
- 2. Add your references in Adstronaut
- 3. Work from the generated drawings
- 4. Set measurements and size grades
- 5. Specify fabrics, trims and quantities
- 6. Explain how the garment is constructed
- 7. Export the pack for your manufacturer
- Time, cost and common questions
1. Start with useful reference photos
Use a clear front image, then add the back and any important close-ups. For this overshirt, the front shows the zip closure, flap pockets and hem; the back supplies the yoke and sleeve information. Those views give the generator much more to work with than a single styled crop.
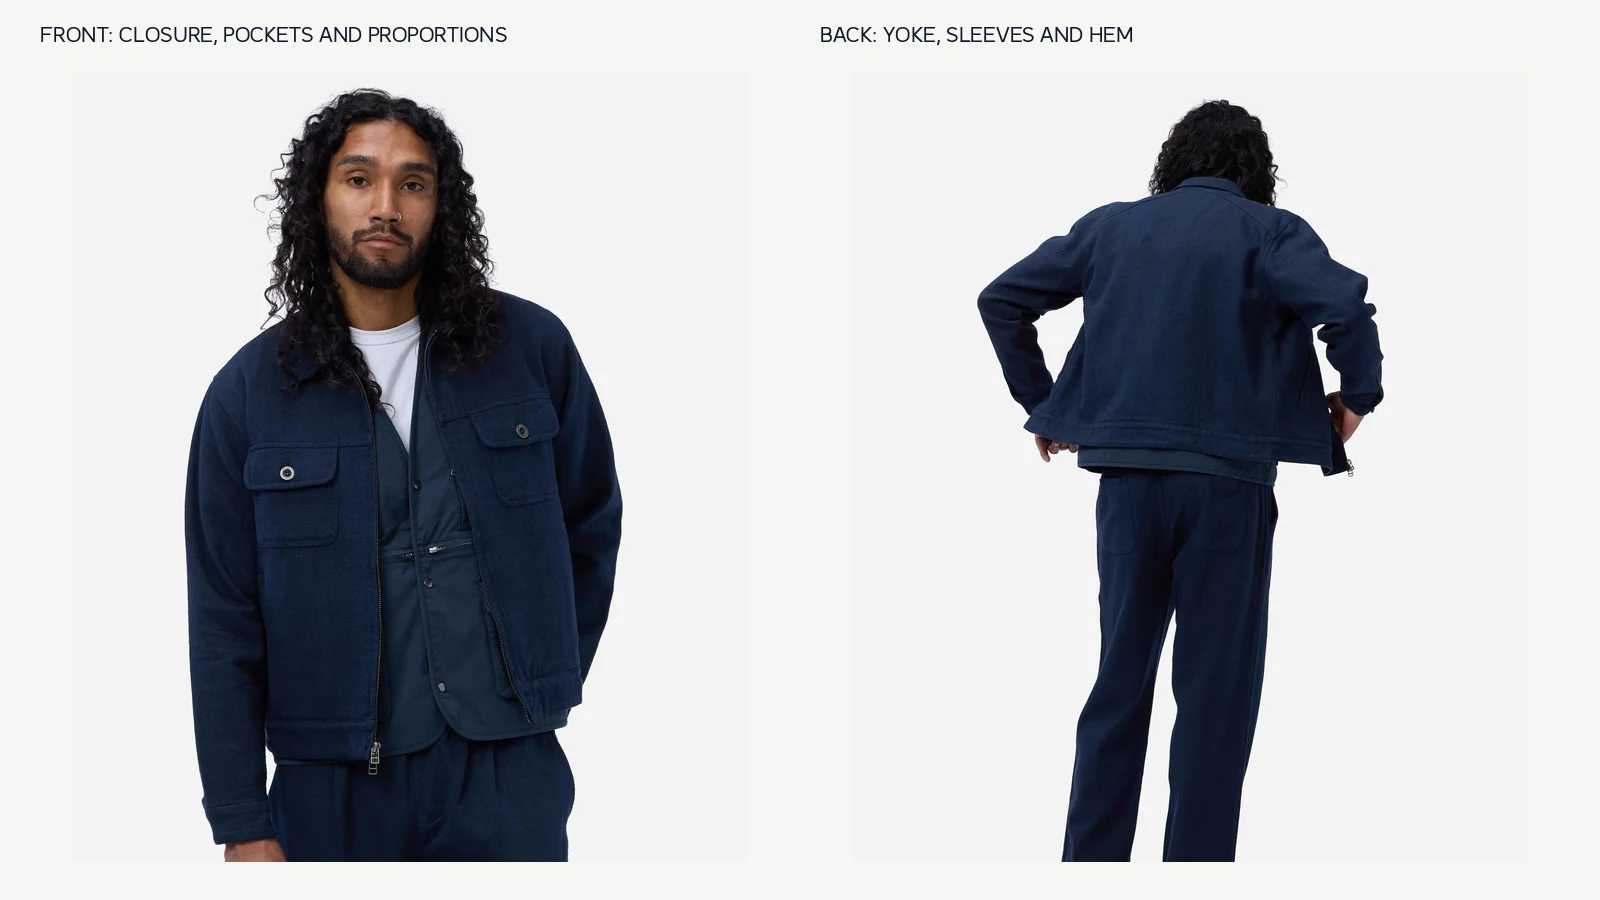
Have these decisions nearby: the garment you want to make, intended fit, sample size, known fabric details and any measurements you already have. Photos communicate the design; your specifications make it your product.
2. Add your references in Adstronaut
Open the Tech Pack Generator and choose New tech pack. The creation screen separates the required Front view from optional Additional views for the back, side, close-ups or interior. Add your images and continue through the setup to generate your pack.
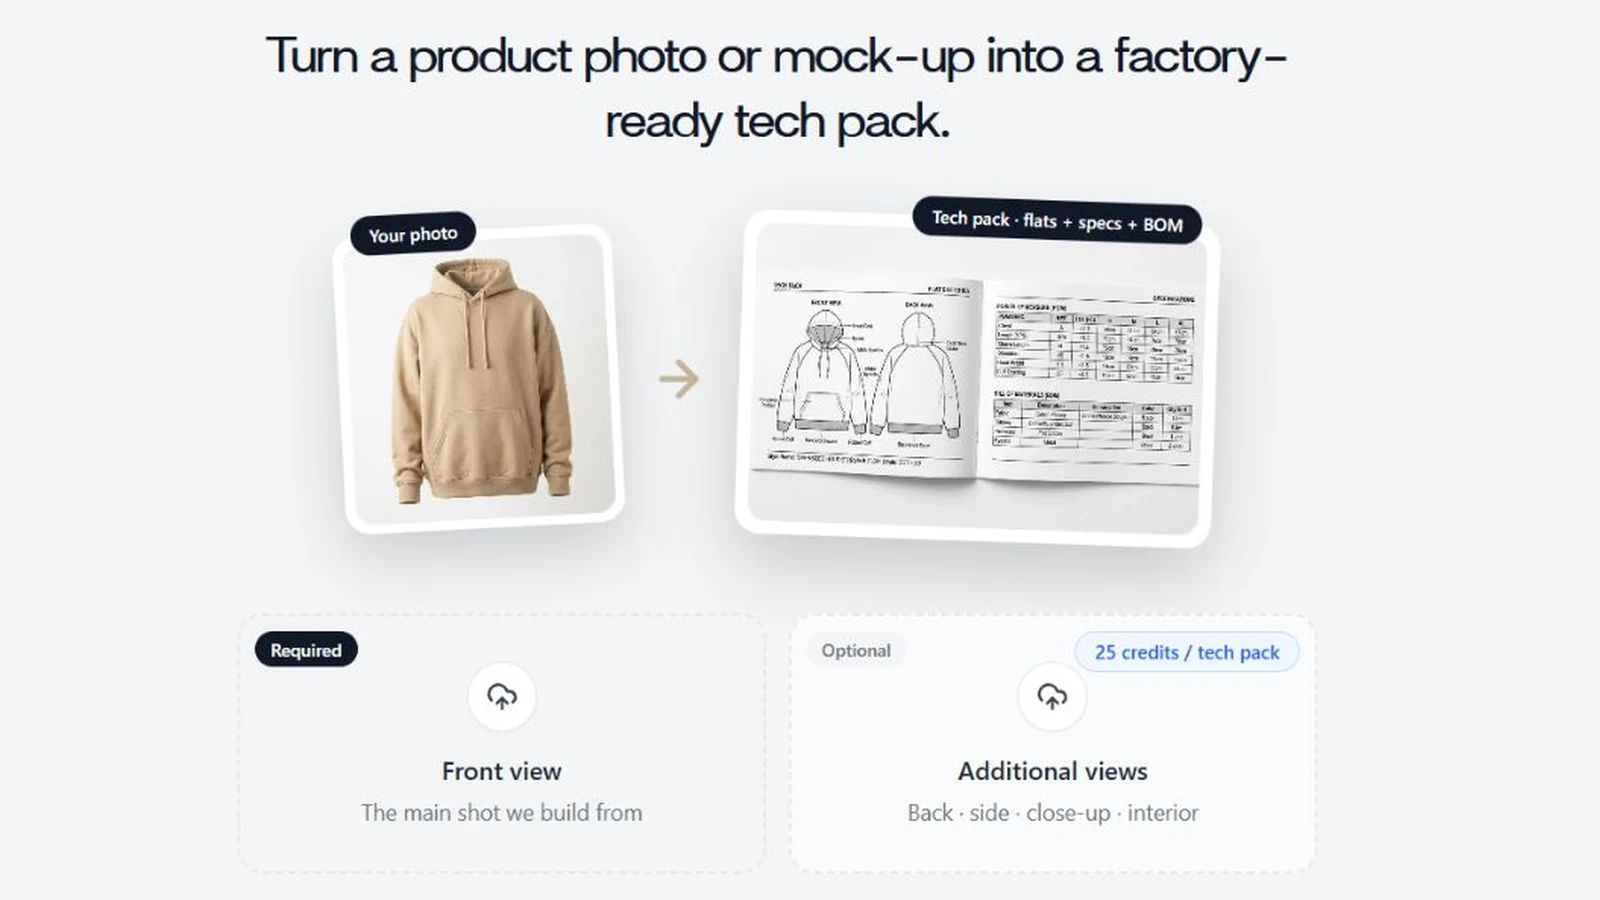
The current upload screen, before adding your images. The hoodie above the controls is the app's introductory illustration; the worked example in this guide is the navy overshirt.
A tech pack uses 25 credits. Signup includes 25 credits for a watermarked preview, so you can see your own garment's result before choosing a paid export plan.
3. Work from the generated drawings
The result opens as an editable workspace. The contents rail connects the drawings, size chart, BOM, sewing details and other sections. This overshirt's annotated front and back sit beside a material overview, so you can compare the design and its components without assembling separate documents.
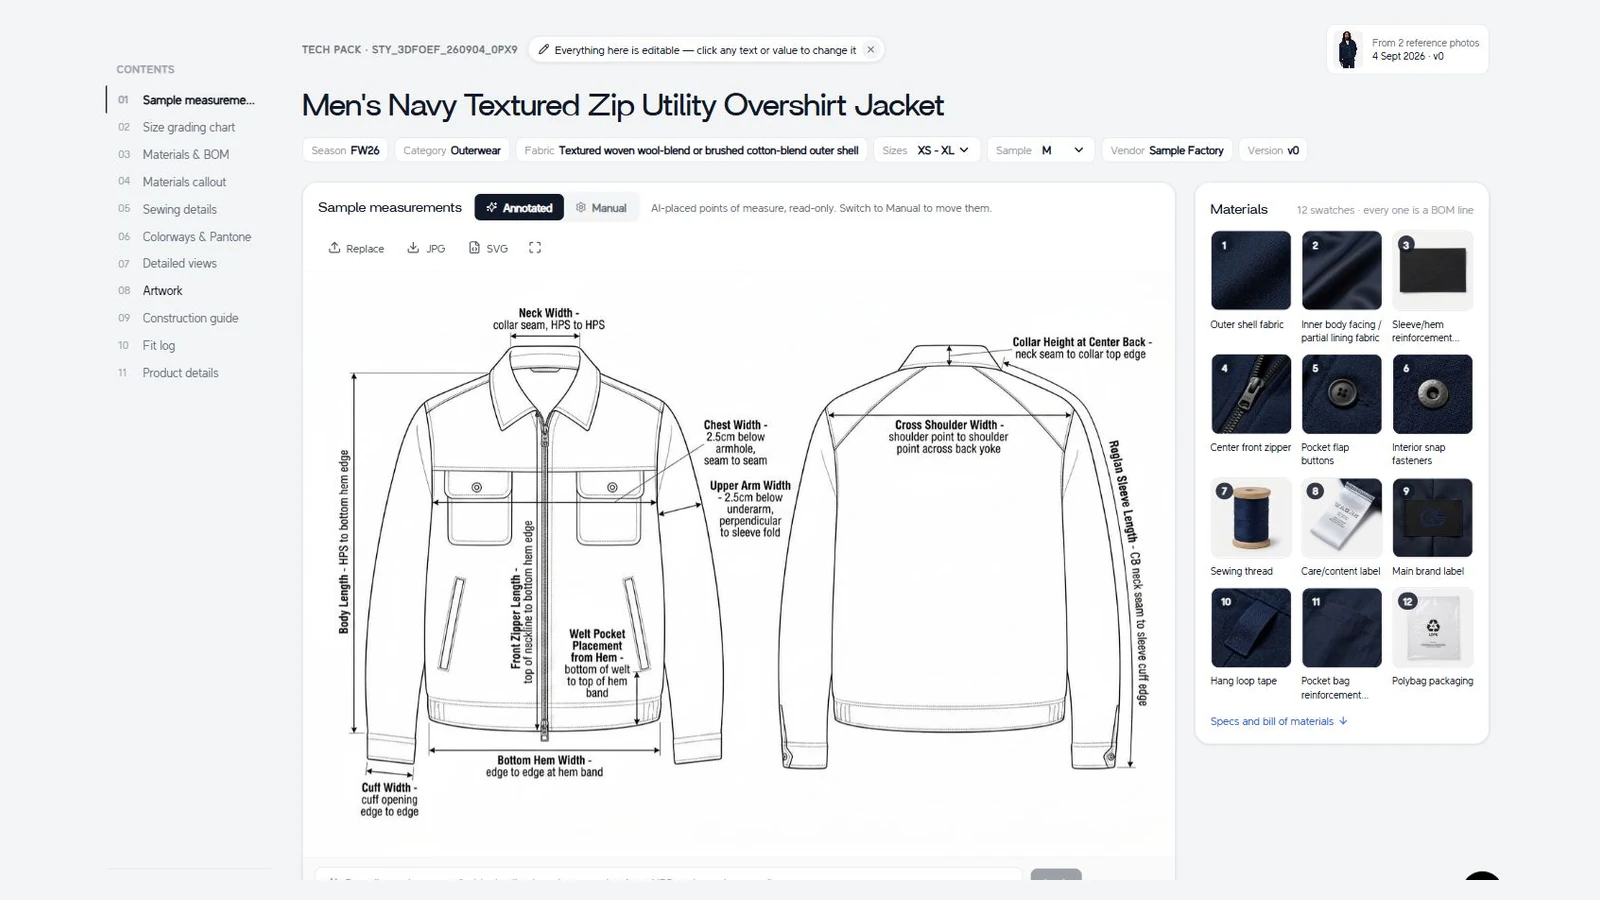
Follow one detail through the pack: the front zip should appear in the drawing, the material list and the construction instructions. Do the same for the flap pockets and hem. This is also the point to set your style name, season, sample size and revision.
4. Set measurements and size grades
Select Size grading chart. The sample-size column is highlighted, and the table keeps each point of measure beside its tolerance and size values. Click a value to edit it; the grade controls let you set increments between size ranges.
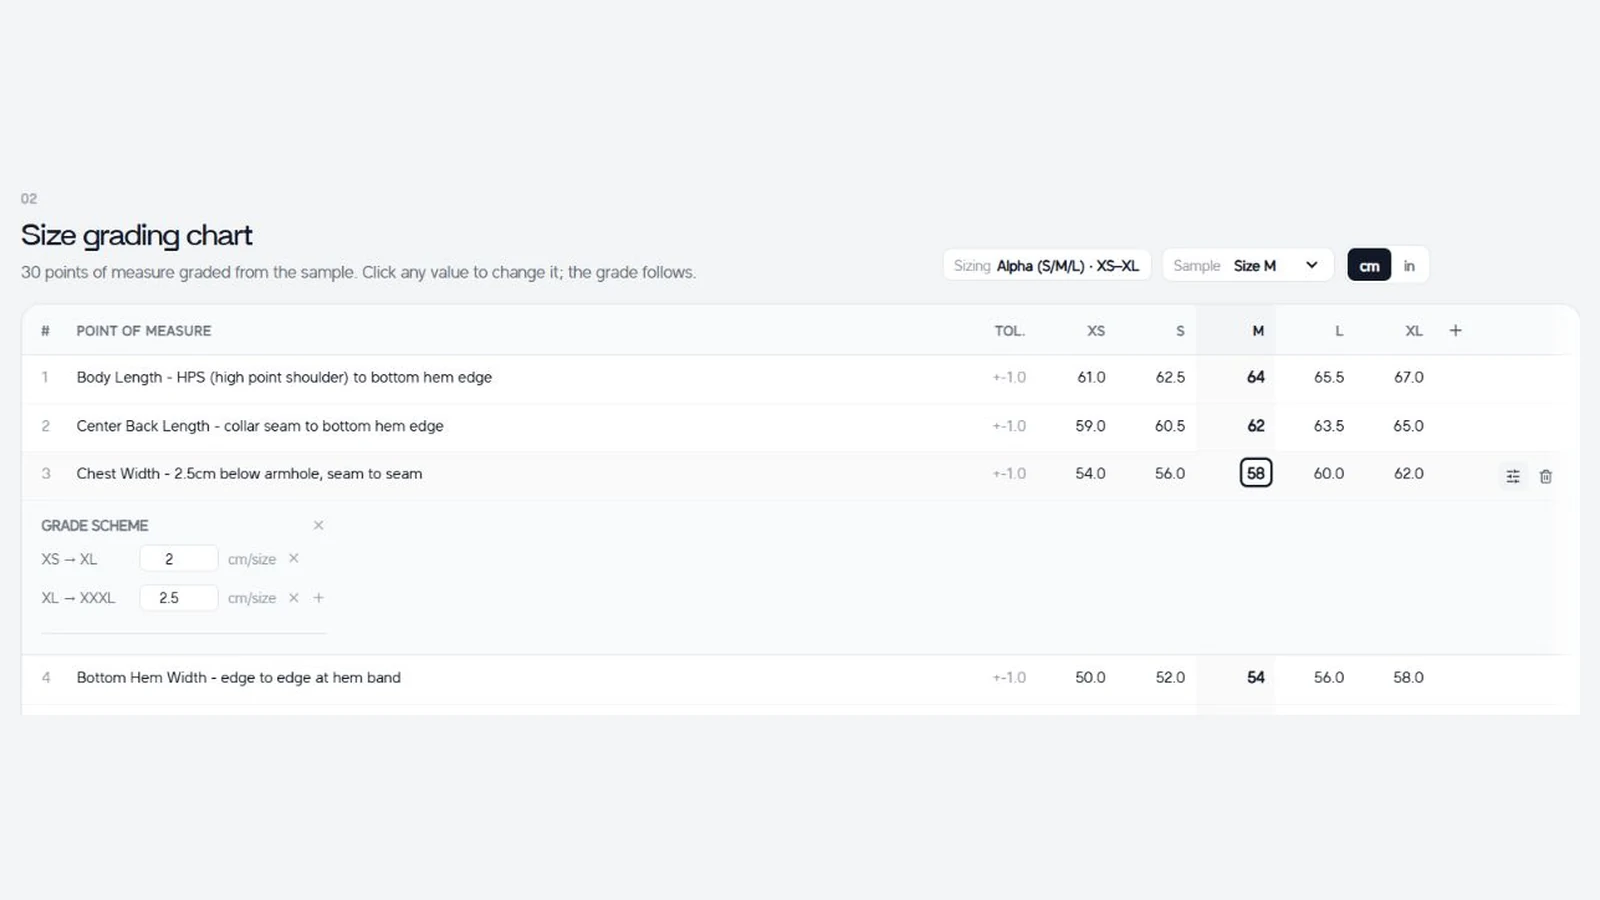
In this saved example, the half-chest row reads:
| Size | S | M | L |
|---|---|---|---|
| Chest width, cm | 56 | 58 | 60 |
The method is 2.5 cm below the armhole, seam to seam. The adjacent grade is 2 cm per size; the tolerance is a separate ±1 cm. That distinction tells a manufacturer both the target size and the allowed variation.
If your approved medium target is 60 cm, change that value and review the resulting grades. Use your garment's intended fit or measured sample to set the targets. For the underlying method, see how to grade clothing sizes.
5. Specify fabrics, trims and quantities
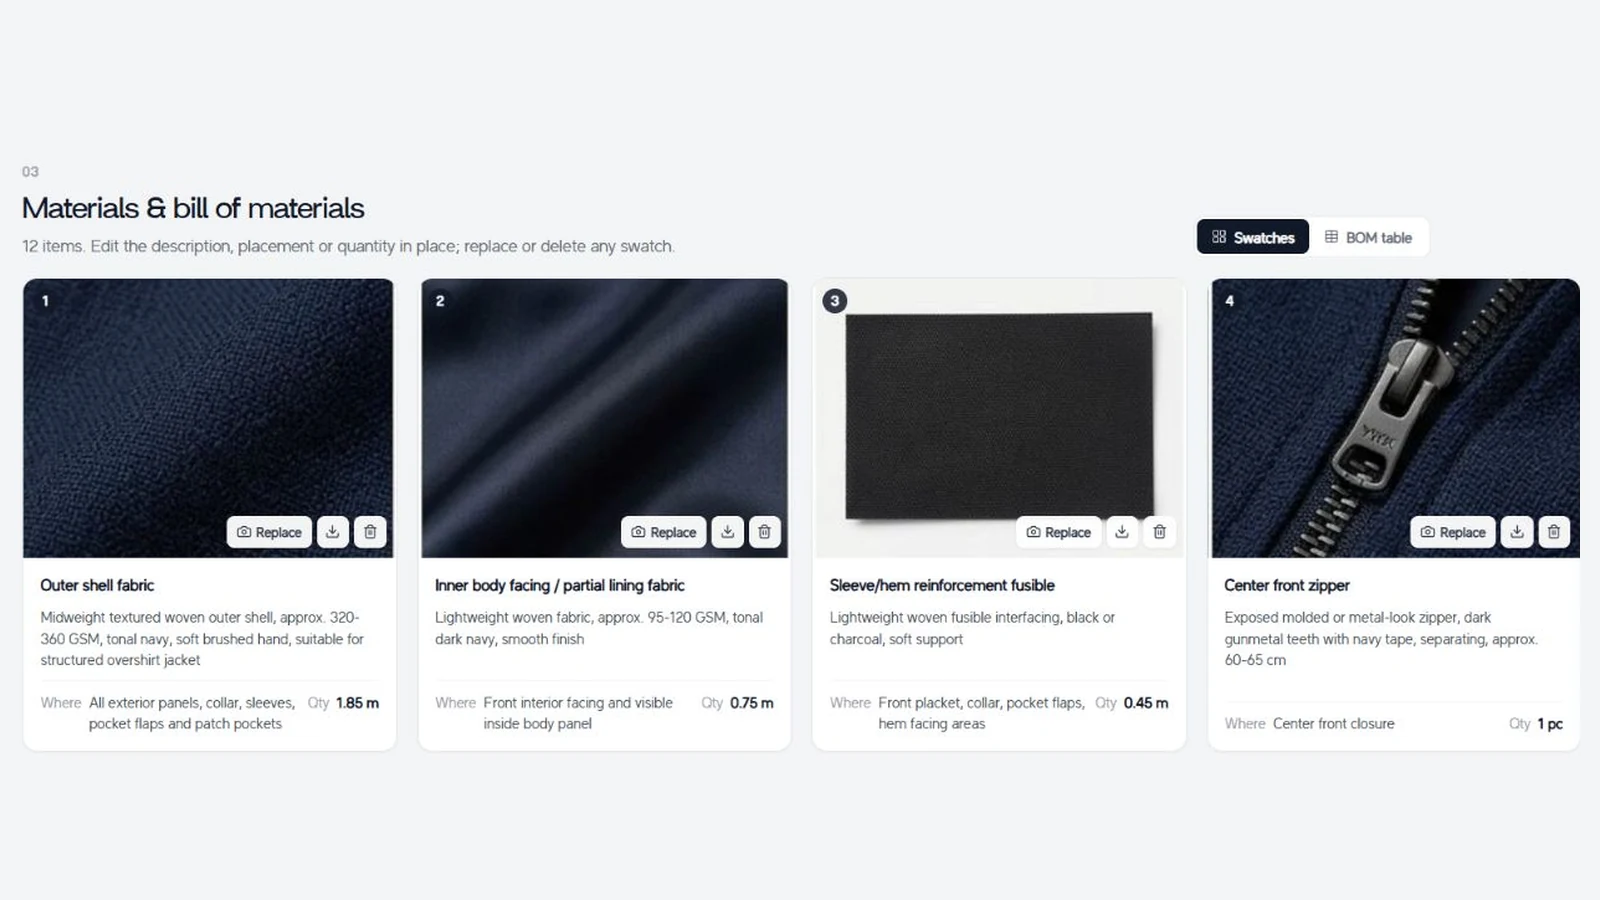
In Materials & BOM, the swatch view makes the components easy to recognize. The overshirt includes the navy shell, facing, reinforcement, zipper, buttons, thread and labels. Each card connects the image to a description, placement and quantity.
Switch to BOM table to work through the same components as rows, including supplier, price and notes. You can edit the descriptions and quantities in place.
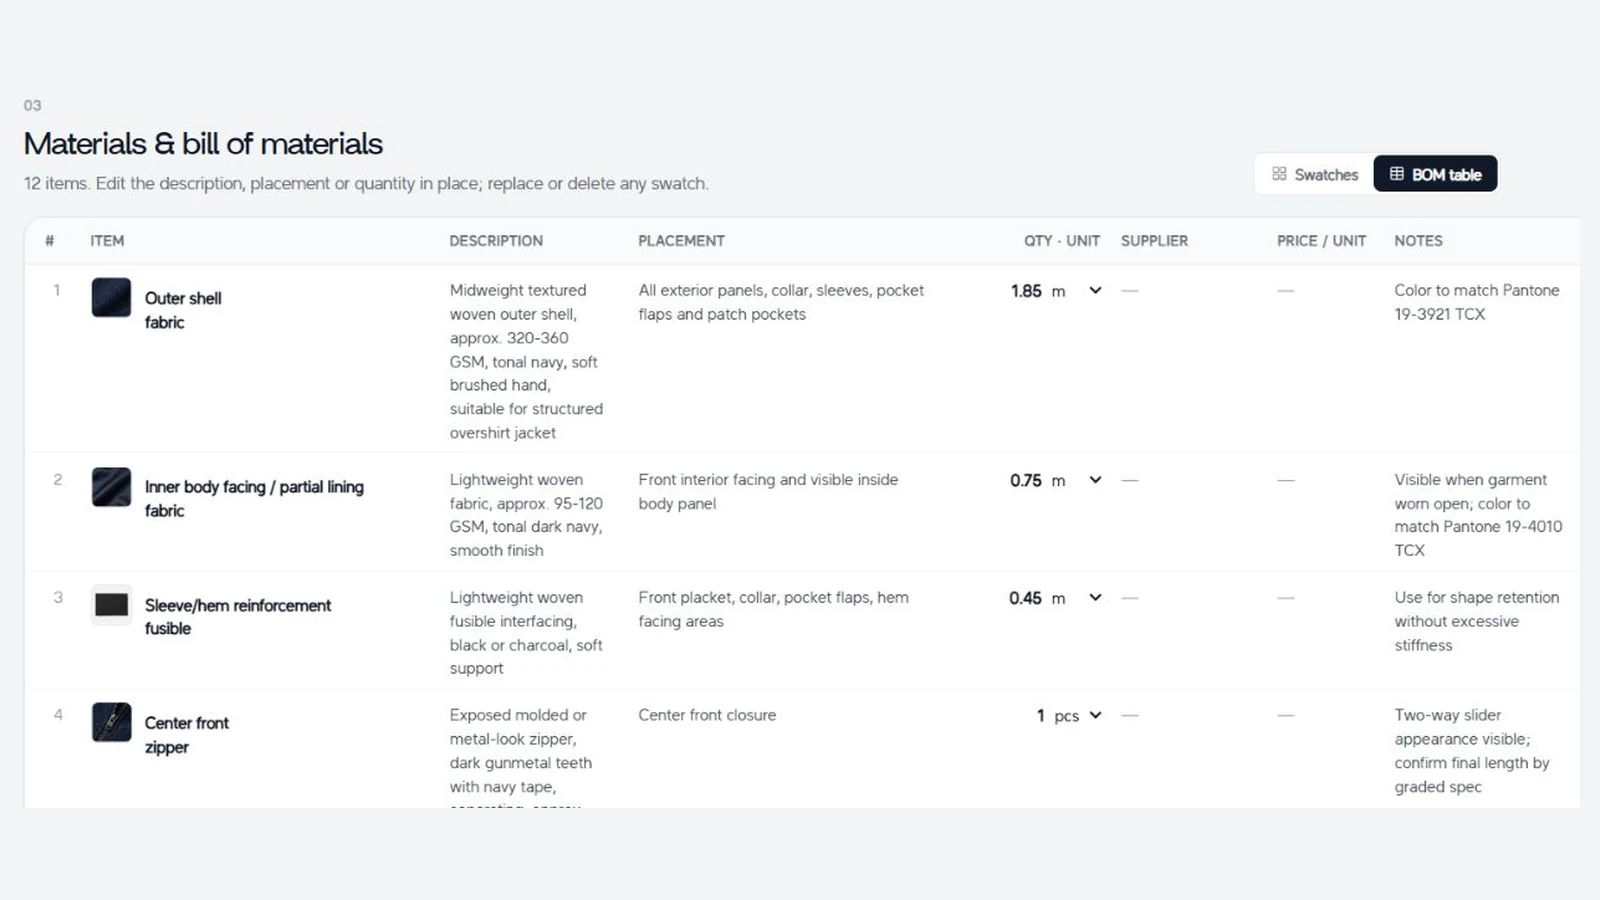
For this style: narrow the proposed shell-fabric description to the composition and weight you select, confirm the zipper specification, and add supplier references when chosen. The example's 1.85 m shell quantity is a starting estimate to reconcile with your size range and cutting plan. The garment BOM guide explains the fields in more detail.
6. Explain how the garment is constructed
Open Sewing details to see construction callouts on the garment itself. Here, the pack identifies the collar, chest-pocket construction, zip edge, sleeve hem, bottom hem and side seam. The accompanying construction guide carries the written instructions.
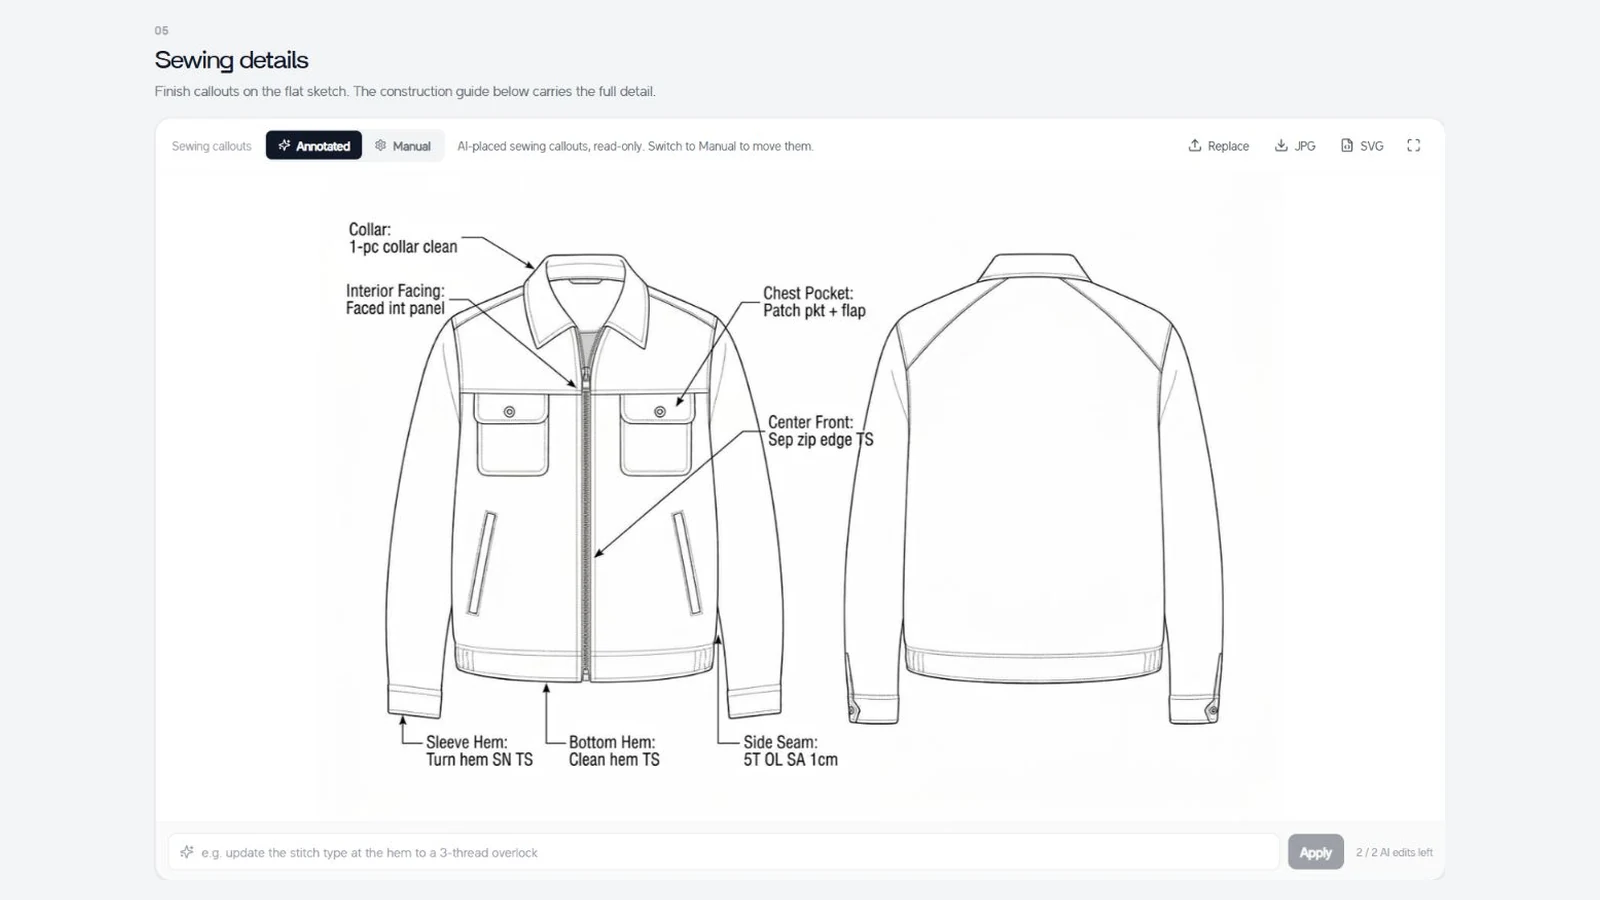
Focus your review on choices that change how the factory makes the garment. For example, make sure the pocket finish and zip installation match your intended design. A short, precise instruction beside the drawing is more useful than another paragraph in an email.
7. Export the pack for your manufacturer
Use Download to choose the deliverable. Adstronaut offers PDF, editable Excel for sizes/BOM, and flat-sketch SVG options in the captured Pro workspace. Send a dated revision so the manufacturer can identify the version being discussed.
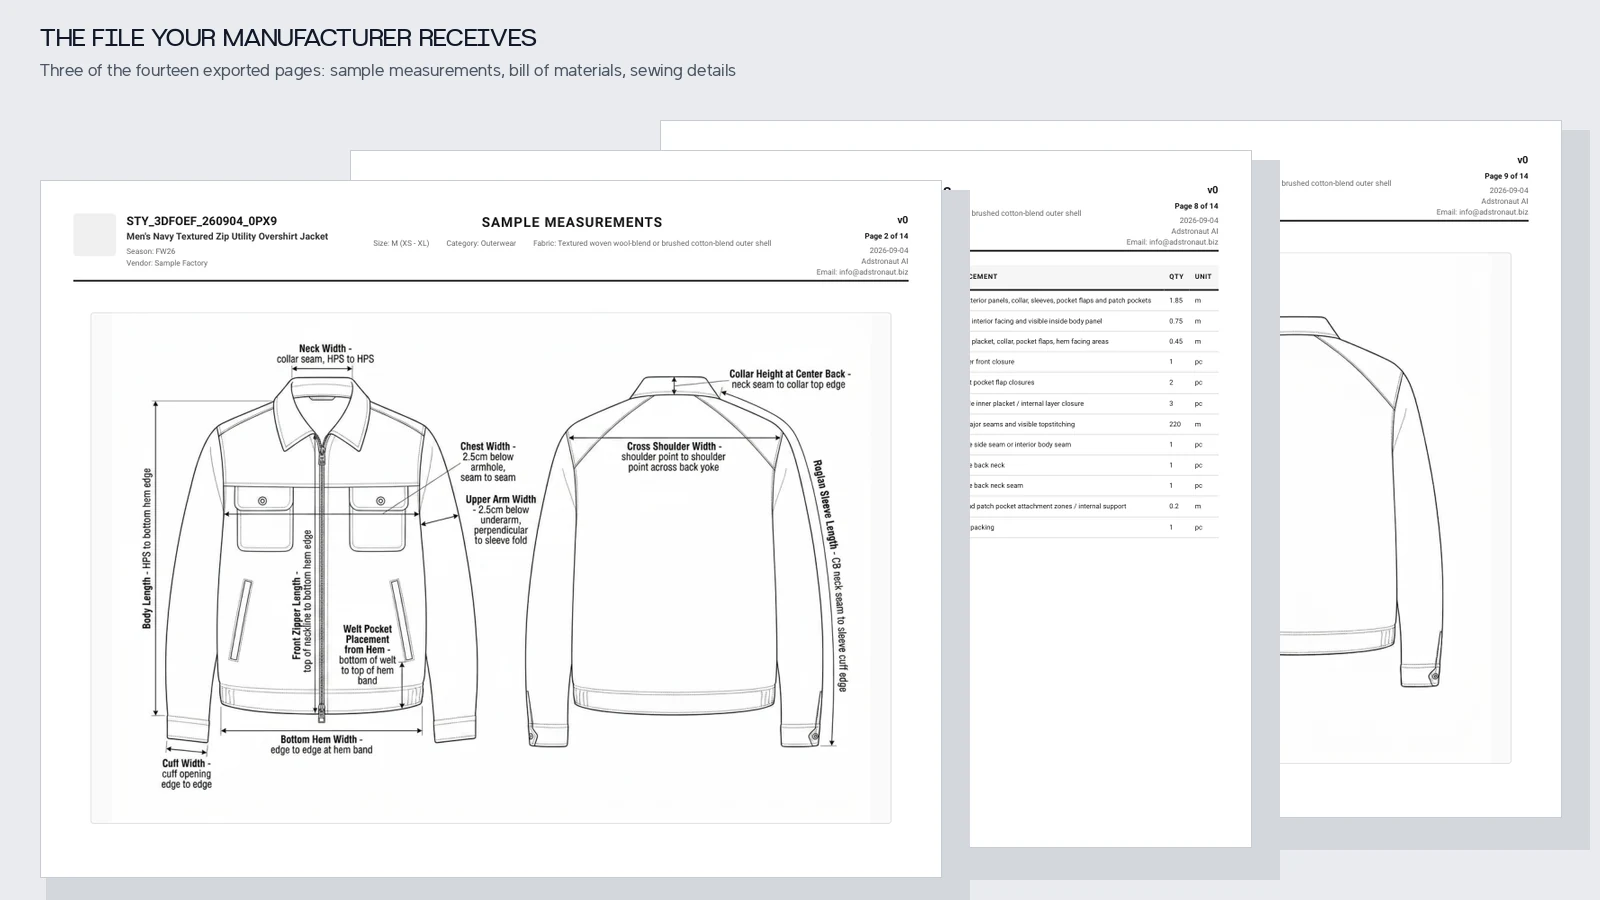
Inspect the result yourself: download the complete 14-page overshirt PDF. It includes the reference photos, annotated measurements, graded size tables, material swatches, BOM, sewing details, colorways, detail views and construction instructions.
Before the handoff, confirm the chosen measurements, materials and construction details, and tell the factory whether you want a quote, a sample or a production revision. Add your quantity, size breakdown and target date using the manufacturer-handoff checklist.
Turn your garment photos into a tech pack →
Time, cost and common questions
How long does it take to create a tech pack?
For planning, allow about 3–5 minutes for generation and 10–30 minutes to review a straightforward style when the design, measurements and materials are already decided. Manual preparation often takes several hours. These are working estimates; this walkthrough reuses a saved pack rather than timing a new generation.
What does Adstronaut cost, and which files can I export?
| Monthly plan | Credits | Packs at full credit allocation | Export access |
|---|---|---|---|
| Standard — $29 | 125 | 5 | Full sections and clean PDF |
| Pro — $69 | 375 | 15 | PDF plus editable Excel/CSV |
| Studio — $149 | 1,000 | 40 | Higher volume and additional sketch-edit allowance |
At full monthly credit use, the subscription allocation is $5.80, $4.60 or about $3.73 per pack respectively. These are subscription allocations, not standalone pack prices. Other tools also use credits. See current plans.
Can I create a tech pack without Illustrator?
Yes. Adstronaut generates the technical drawings and document sections from your references. You can develop the pack in the editor and export it for the next stage. If your manufacturer requests a particular vector or source format, agree that format before handoff.
Can I start with a free template instead?
Yes. Download the editable spec-sheet workbook and printable PDF, or explore the tech-pack template library. A template gives you the structure to fill yourself; Adstronaut generates the drawings and document content for your garment.
Does a tech pack replace a sewing pattern?
They serve different jobs. The tech pack communicates the product's specifications; a sewing pattern defines the pieces used to make it. Pattern development, sampling and fit checks remain part of bringing the garment to production.