Hoodie Tech Pack - From Design to Factory-Ready Specs
A hoodie tech pack is a technical manufacturing document that specifies fabric weight (typically 260–500+ GSM fleece or French terry), hood construction (2-piece vs 3-piece), hardware details (eyelets, drawcord type, aglets), pocket construction with reinforcement specs, and fit profile (standard, slim, or oversized/drop-shoulder). Unlike simpler garments, hoodies require a BOM with 7+ components — shell fleece, ribbing, hood lining, neck tape, drawcord, eyelets, and aglets — making a complete tech pack essential for accurate factory pricing and correct first samples.
This guide covers the five key components of a factory-ready hoodie tech pack, the most common manufacturing mistakes, and how to generate production-ready specs in minutes. New to tech packs? Start with our complete guide to fashion tech packs.
Table of Contents
- What is a Hoodie Tech Pack?
- Key Components of a Hoodie Tech Pack
- 1. The Technical Flat Sketch (Hood Details)
- 2. Measurements: The "Oversized" Challenge
- 3. Bill of Materials (BOM): Hardware & Layers
- 4. Construction: Pockets & Reinforcement
- 5. Zip-Up vs. Pullover Variations
- Common Hoodie Tech Pack Mistakes
- Create Your Hoodie Tech Pack in Minutes
- Frequently Asked Questions
What is a Hoodie Tech Pack?
A Hoodie Tech Pack is the manufacturing blueprint for your garment. While many brands start by printing on "blanks" (pre-made hoodies), true fashion brands utilize "Cut & Sew" manufacturing. This means you are creating the pattern from scratch.
A professional hoodie pack must define:
- Fabric Weight: Is it a standard 280GSM or a luxury 450GSM heavyweight fleece?
- Hardware: Are the eyelets metal or embroidered? Are the drawstring tips (aglets) plastic or silicone dipped?
- Fit Profile: Is it a slim fit or a drop-shoulder "oversized" fit?
Without these definitions, the factory cannot give you an accurate price quote or a correct sample.
Key Components of a Hoodie Tech Pack
When you upload your hoodie design to Adstronaut AI, the system automatically organizes your project into the essential tabs required for complex garment production.
1. The Technical Flat Sketch (Hood Details)
A standard front/back sketch isn't enough. A hoodie sketch needs to show the Hood Construction. Is it a 2-piece hood (seam down the middle) or a 3-piece hood (center panel)?
Adstronaut AI Feature: Our AI converts your photo into a vector-style line drawing that clearly outlines the pocket shape, the cuff width, and the hood structure. This visual clarity prevents the factory from sewing a "pointy" hood (the gnome look) versus a rounded, fitted hood.
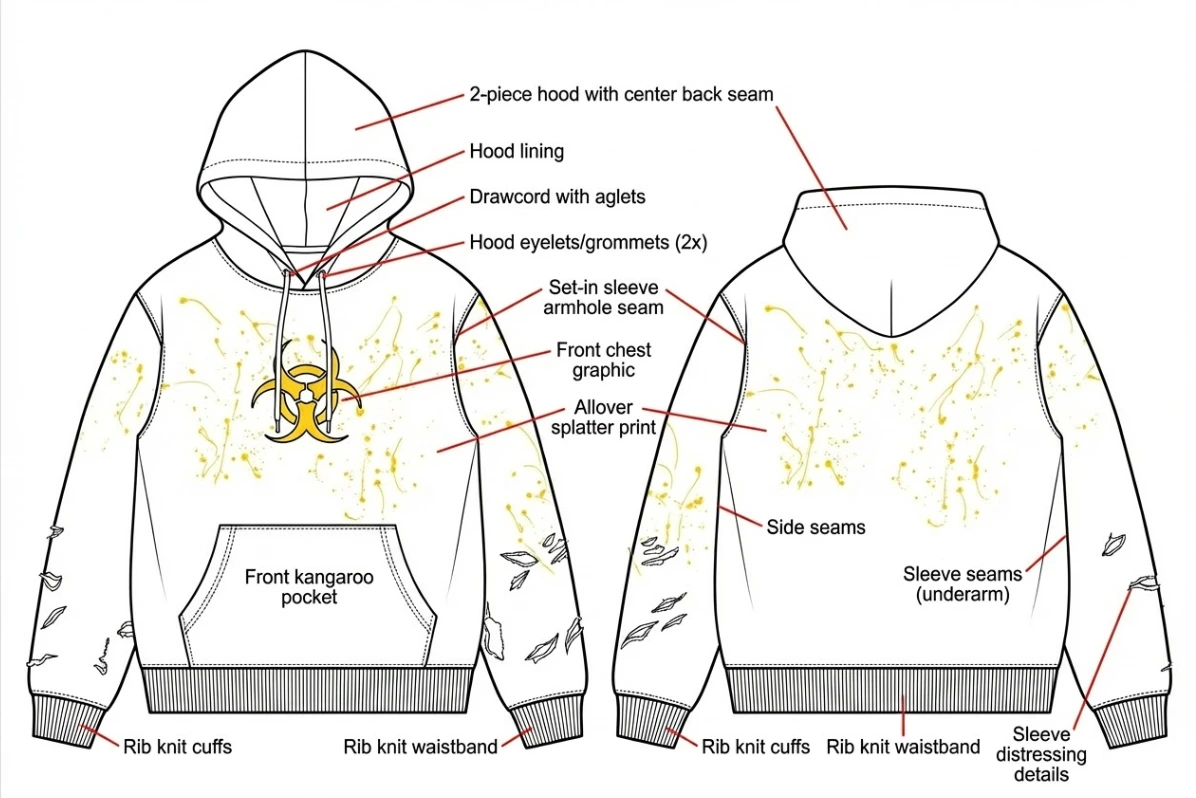 Technical flat sketch showing hood seam, kangaroo pocket, and cuff details.
2. Measurements: The "Oversized" Challenge
The "Oversized Hoodie" is the most searched style in 2026. However, "oversized" is not a technical term. You need specific grading rules to achieve that boxy look without it looking like a mistake.
Critical Measurements:
- Drop Shoulder: The seam of the shoulder should sit well down the arm, not at the shoulder bone.
- Chest Width: Usually 2-4 inches wider than a standard fit.
- Ribbing Tension: The waist ribbing needs to be loose enough so the hoodie hangs straight, or tight enough to bubble over the waist (the "cropped" look).
Adstronaut AI Feature: The Sample Measurements tab allows you to draw these specific lines. You can annotate the "Drop Shoulder" length directly on the sketch, ensuring the pattern maker understands the intended silhouette.
Standard Pullover Hoodie POM Reference (unisex standard fit, inches):
| Point of Measure | XS | S | M | L | XL |
|---|---|---|---|---|---|
| Chest Width (1" below armhole) | 21 | 22 | 23.5 | 25 | 26.5 |
| Body Length (HPS to hem) | 26 | 27 | 28 | 29 | 30 |
| Shoulder Width | 18 | 18.75 | 19.5 | 20.25 | 21 |
| Sleeve Length (CB neck) | 32 | 32.75 | 33.5 | 34.25 | 35 |
| Armhole Depth | 9.75 | 10 | 10.25 | 10.5 | 10.75 |
| Bottom Rib Height | 2 | 2 | 2 | 2 | 2 |
| Hood Height | 14 | 14.5 | 15 | 15.5 | 16 |
| Pocket Opening | 6.5 | 6.75 | 7 | 7.25 | 7.5 |
For an oversized or drop-shoulder fit, add 2–4" to chest width, extend the shoulder by 1.5–2.5", and lengthen the body by 2–3". Keep the grade rule consistent across sizes so the oversized silhouette reads intentional rather than accidental.
3. Bill of Materials (BOM): Hardware & Layers
A hoodie BOM is significantly longer than a T-shirt BOM. You are managing multiple fabric types and small metal parts.
The Hoodie BOM Checklist:
- Shell: The main body fleece.
- Rib: The cuffs and waistband (must have Spandex for recovery).
- Lining: The inside of the hood (often Single Jersey or Self-Fabric).
- Tape: Neck tape for the back collar.
- Drawcord: Round or flat? Cotton or Poly?
- Eyelets: The holes the cord passes through.
- Aglets: The tips of the cord.
Adstronaut AI Feature: The BOM tab pre-formats these rows. The AI detects the presence of drawstrings and pockets, prompting you to fill in the supplier details. It also allows you to upload or generate reference images for the hardware, so the factory knows exactly what "Gunmetal Matte Aglet" looks like.
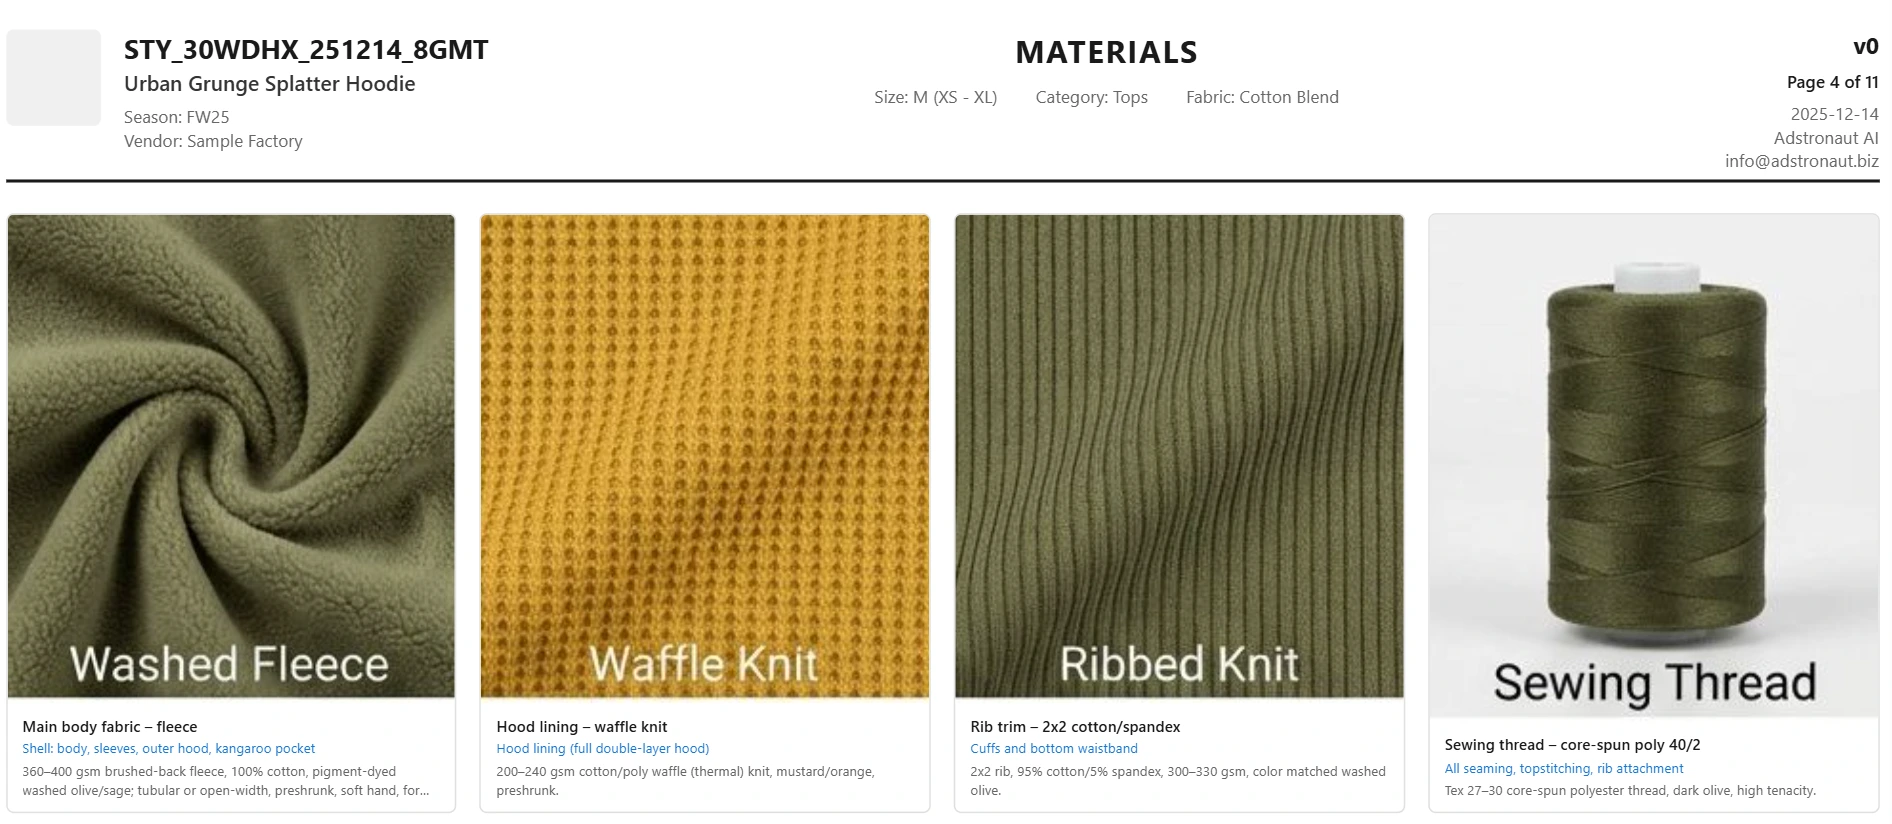 BOM showing fleece, ribbing, eyelets, and drawcord specifications.
4. Construction: Pockets & Reinforcement
The Kangaroo pocket is the weak point of any hoodie. If you put heavy items (like a phone or keys) in it, the top corners will eventually tear away from the body.
The Solution: Bar Tacks. A "Bar Tack" is a tight cluster of stitches used to reinforce stress points. Your tech pack must specify bar tacks at the top corners of the pocket.
Adstronaut AI Feature: Use the Garment Callouts tab to drag a numbered marker to the pocket corners. In the notes section, you can specify: "Reinforce pocket corners with 1cm bar tack." This small detail adds years to the life of the garment.
 Macro shot showing bar tack stitching at pocket corner.
5. Zip-Up vs. Pullover Variations
If you are designing a Zip-Up Hoodie, your tech pack has extra requirements.
- Zipper Gauge: Do you want a chunky #8 zipper or a standard #5?
- Zipper Tape: Does the fabric tape match the hoodie color (DTM) or contrast?
- Split Pocket: The kangaroo pocket is split in two; you need to measure the distance from the zipper to the pocket edge.
Adstronaut AI handles both styles. When you upload a zip-up image, the system structure adapts to include zipper specifications in the BOM and measurements.
Create your hoodie tech pack — BOM, grading, and all →
Common Hoodie Tech Pack Mistakes
- Ignoring the Hood Size: Most first-time samples have hoods that are too small. Always specify the "Hood Height" and "Hood Depth" measurements to ensure it covers the head comfortably.
- Cheap Ribbing: If you don't specify "Cotton/Spandex" blend for cuffs, the factory may use 100% cotton rib, which stretches out and becomes loose after a few wears.
- Wrong Aglet Size: If your eyelet is 8mm wide but your aglet is 10mm wide, the drawstring won't fit through the hole. Your tech pack must cross-reference these hardware sizes.
Create Your Hoodie Tech Pack in Minutes
Designing a premium hoodie requires managing a lot of moving parts. Don't rely on a messy spreadsheet or a handwritten note.
Adstronaut AI provides the professional structure you need to organize your fabrics, hardware, and measurements into a single, cohesive document.
- Upload your hoodie photo.
- Define your hardware (eyelets/cords) in the BOM.
- Annotate the drop-shoulder and hood dimensions.
- Export a factory-ready PDF.
Turn your streetwear concept into a heavyweight reality. Learn the step-by-step process in our how to create a tech pack guide, or browse more tech pack examples.
Generate your hoodie tech pack for free →
Frequently Asked Questions
What is the best fabric weight for a hoodie?
- Standard/Lightweight: 260-300 GSM (Grams per Square Meter).
- Midweight: 300-350 GSM.
- Heavyweight/Premium: 400-500+ GSM. This is the standard for high-end streetwear brands.
Do I need a tech pack for a blank hoodie?
If you are buying blanks (like Rue Porter or Independent Trading Co) and printing on them, you do not need a manufacturing tech pack. You need a "Print Pack." If you are manufacturing the hoodie from scratch (Cut & Sew), a tech pack is mandatory.
What is the difference between French Terry and Fleece?
- Fleece: Has a fuzzy, brushed interior (warm, soft).
- French Terry: Has loops on the interior (breathable, dryer). Your tech pack BOM must specify which one you want, or the factory will choose for you.
What measurements are most important for an oversized hoodie?
The four critical measurements for an oversized fit are: (1) drop shoulder length (typically 2–4 inches past the natural shoulder), (2) chest width (2–4 inches wider than standard), (3) body length (2–3 inches longer), and (4) sleeve length measured from the dropped shoulder point, not the neck. You must also specify ribbing tension — loose for a straight hang, or tight for the "cropped bubble" look.
How do I specify drawcord details in a tech pack?
Your BOM should include: drawcord material (cotton, polyester, or waxed cotton), shape (round or flat), width (typically 5–8mm), length (usually 110–130cm for adult hoodies), and tip finish (plastic aglet, metal aglet, silicone dip, or heat-sealed). Also specify the eyelet hole diameter — it must be 2mm wider than the cord to allow smooth adjustment. Cross-reference aglet width with eyelet diameter to prevent fit issues.
What is the difference between a 2-piece and 3-piece hood?
A 2-piece hood has a single center seam running from forehead to back of neck, creating a more pointed shape. A 3-piece hood adds a center panel (gusset) running from front to back, creating a rounder, more fitted shape that sits better when worn up. Premium streetwear brands typically prefer 3-piece hoods. Your tech pack should specify which construction you want and include the hood height and hood depth measurements.
Sources and further reading:
- ASTM D5219 — Standard Guide for Labeling of Care Instructions for Textile and Leather Products (care label standards for fleece garments)
- Maker's Row — Cut & Sew Manufacturing Guide (hoodie-specific factory requirements)
- Adstronaut AI — The Complete Guide to Fashion Tech Packs (comprehensive tech pack overview)