Clothing Size Grading: Grade Rules and a Worked Example
Clothing size grading builds every size from one base size by applying a defined change, the grade rule, at each point of measure. The chest may grow 2 cm per size while a cuff grows 0.3 cm and a hem band does not change at all. The Adstronaut AI tech pack generator grades all of a garment's points of measure from the sample size automatically, and lets you change any value or rule in place. Here is what that looks like for one navy utility overshirt, with the real numbers.
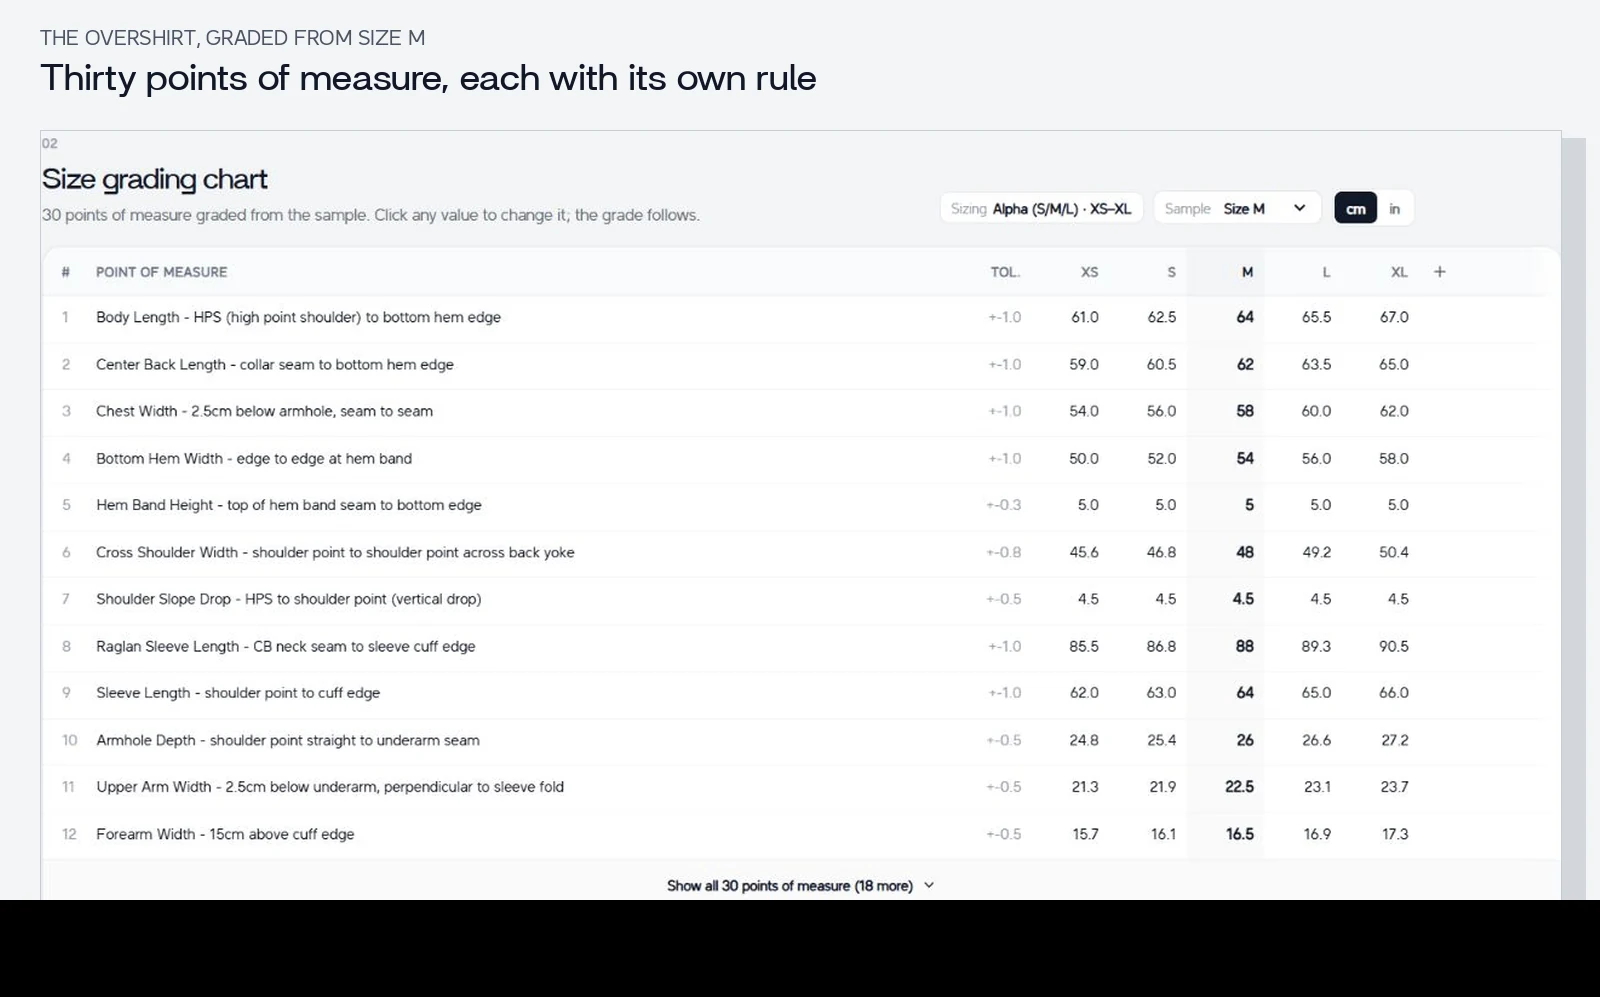
The same garment as the tech-pack walkthrough. Sample size M is highlighted; every other column follows that row's rule. Click any image to open it full size.
Download the free spec-sheet workbook with a worked example · Open the overshirt's complete PDF
Grade your own garment from a photo →
In this guide
- Start with the base size and the measurement method
- A real worked example: twelve rules for one overshirt
- Grade rule versus tolerance
- Change one value and the grade follows
- What the factory receives
- From a table to a product that fits
- Common errors to check
- Frequently asked questions
Start with the base size and the measurement method
Decide the customer, the size range, the garment category, the fit and the fabric behaviour before you write a single rule. A loose woven overshirt, a fitted stretch top and a structured jacket do not share one grading table.
The base-size measurements come from an approved sample or from reviewed design targets. Record which. Then define each point of measure so that two people measure the same thing: the endpoints, the unit, flat width or circumference, and whether trim is included. The overshirt's chest row is written as "Chest width, 2.5 cm below armhole, seam to seam", not just "chest".
Keep body measurements and garment measurements apart. The gap between them is the ease you intended plus construction and stretch, and it changes with the product. A size M has no universal dimensions.
A real worked example: twelve rules for one overshirt
These are the first twelve of the overshirt's thirty points of measure, in centimetres, exactly as the chart above shows them. The rule column is the step between adjacent sizes.
| Point of measure | S | M (base) | L | Rule per size | Tolerance |
|---|---|---|---|---|---|
| Body length, HPS to hem | 62.5 | 64 | 65.5 | +1.5 | ±1.0 |
| Centre back length | 60.5 | 62 | 63.5 | +1.5 | ±1.0 |
| Chest width, 2.5 cm below armhole | 56 | 58 | 60 | +2.0 | ±1.0 |
| Bottom hem width | 52 | 54 | 56 | +2.0 | ±1.0 |
| Hem band height | 5 | 5 | 5 | 0 | ±0.3 |
| Cross shoulder width | 46.8 | 48 | 49.2 | +1.2 | ±0.8 |
| Shoulder slope drop | 4.5 | 4.5 | 4.5 | 0 | ±0.5 |
| Raglan sleeve length, CB neck to cuff | 86.8 | 88 | 89.3 | +1.2 to +1.3 | ±1.0 |
| Sleeve length, shoulder to cuff | 63 | 64 | 65 | +1.0 | ±1.0 |
| Armhole depth | 25.4 | 26 | 26.6 | +0.6 | ±0.5 |
| Upper arm width | 21.9 | 22.5 | 23.1 | +0.6 | ±0.5 |
| Forearm width | 16.1 | 16.5 | 16.9 | +0.4 | ±0.5 |
Three things to read off that table. Widths across the body grade in larger steps than lengths. Details that describe the design rather than the wearer, such as the hem band height and the shoulder slope, do not grade at all. And a tolerance is not the same number as the rule: the chest moves 2 cm per size but a sample only has to land within 1 cm of its target.
The downloadable workbook keeps those inputs separate. Enter a base value and a rule for each row and it calculates the adjacent sizes; blank inputs stay blank rather than becoming an approved zero.
Grade rule versus tolerance
The grade rule changes the target between sizes. The tolerance is how far a measured sample may deviate from one target before it fails.
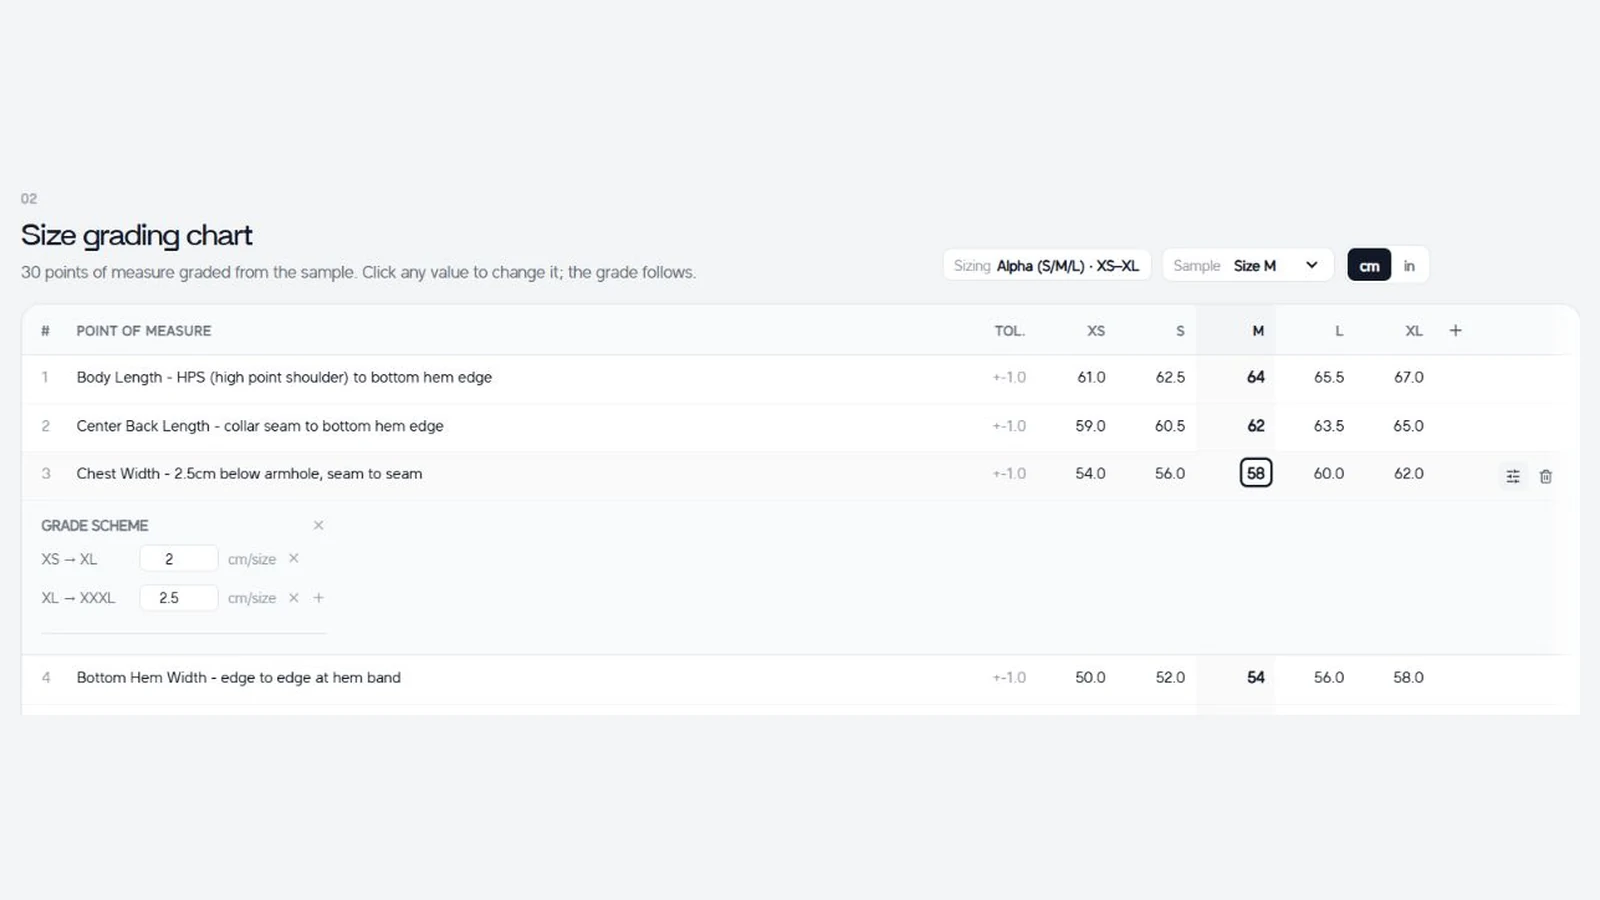
For the overshirt's medium chest of 58 cm with a tolerance of ±1 cm, the acceptable interval is 57 to 59 cm. The 2 cm rule that produces the 56 and 60 for S and L is a different number with a different job. Agree tolerances per point of measure with your technical and manufacturing team; do not copy one value down the column.
If a sample falls outside its interval, check the measurement method and the unit before anything else. The cause may be construction, shrinkage, a different way of measuring or a wrong target. Widening the tolerance so the sample passes hides that decision instead of making it.
Change one value and the grade follows
Click any value in the chart and type the new one. Change the medium chest from 58 to 60 and the rule regrades the row: 56, 58, 60, 62, 64. Open the grade scheme on a row to change the rule itself, including a different step for the larger sizes, which is why the chest uses 2 cm per size to XL and 2.5 cm beyond it.
That verifies the arithmetic, not the fit. If the wearer or the silhouette changes, the rules may need to change too. Switching the chart from centimetres to inches converts every value, rule and tolerance together, so the table never mixes units. Relabelling M as another size does not make the grading right for a different sizing system; switch the sizing system instead.
What the factory receives
The graded chart exports as it stands, with the sample size highlighted, the tolerance beside each row and the method in each point-of-measure name.
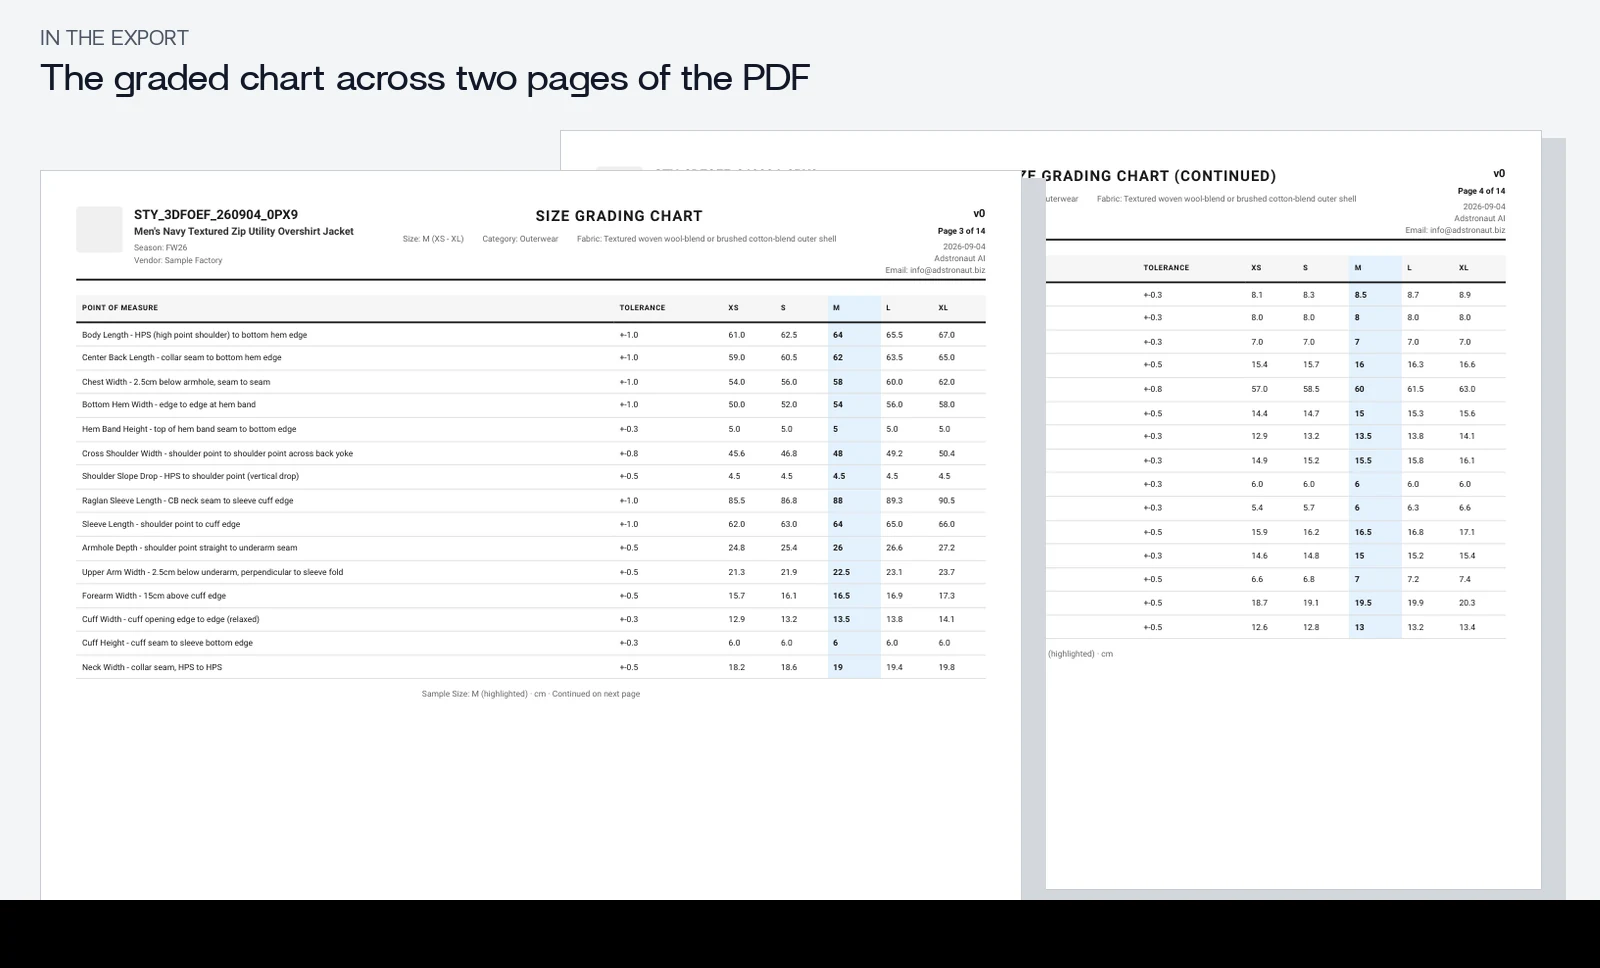
Send it as part of the pack, not on its own. The factory reads the measurements against the flat with the points of measure drawn on it and against the construction notes, and quotes a revision. The manufacturer handoff guide shows the whole package for the same overshirt.
From a table to a product that fits
A size table is one part of the specification. A pattern maker turns the design and fit intent into pattern pieces, and physical samples still have to be measured and worn. A spreadsheet does not check balance, movement, stretch recovery or how adjoining pieces relate.
Record sample findings against the document revision they were measured on, and keep three things apart: the actual measured value, the target, and the change you are requesting. "The sample is short" is an observation; shortening the target is a design decision.
Adstronaut produces the graded table as part of the tech pack, from your photos and your sample size, with every value and rule editable before export. Supply the specifications you know, review the proposed rows, and export.
Generate the graded chart for your style →
Common errors to check
| Error | Better check |
|---|---|
| Every point of measure grows by the same amount | Give each row its own rule and look at the relationships between rows |
| A body circumference is typed into a flat garment-width field | Label the measurement type and method before entering values |
| A generated or copied number is treated as measured | Record the source: sample, design target or assumption |
| One tolerance is copied down the whole column | Agree tolerances that suit the product and the point of measure |
| Size labels are changed without reviewing the table | Review the intended customer and switch the sizing system properly |
| Only the base size is ever fitted | Plan sample checks across the size range, not just the middle |
Frequently asked questions
Can I grade a garment by increasing everything 5%?
A uniform scale does not preserve fit and construction relationships. In the overshirt, the chest grows 2 cm per size, the cuff 0.3 cm and the hem band not at all. Define a rule per point of measure and check the resulting sizes.
Is size grading the same as a size-chart generator?
Not necessarily. A storefront chart helps shoppers pick a size; a development specification records the intended garment dimensions and how they are measured. The size-chart tool is a separate resource for the first job.
Are the worksheet's example values standards?
No. They are illustrative inputs that make the formulas understandable. Replace them with reviewed values for your product.
Can I create the complete pack without Illustrator?
Yes. Follow the tech-pack creation guide to go from photos to drawings, measurements, materials and construction in one document.
Related resources
- Spec-sheet explanation: fields and measurement methods
- Free spec-sheet worksheet: editable example and printable PDF
- Manufacturer handoff guide: the same overshirt, sent to a factory