What is a marker in garment manufacturing?
Updated June 10, 2026 · Fact-checked against vendor pricing pages and primary sources
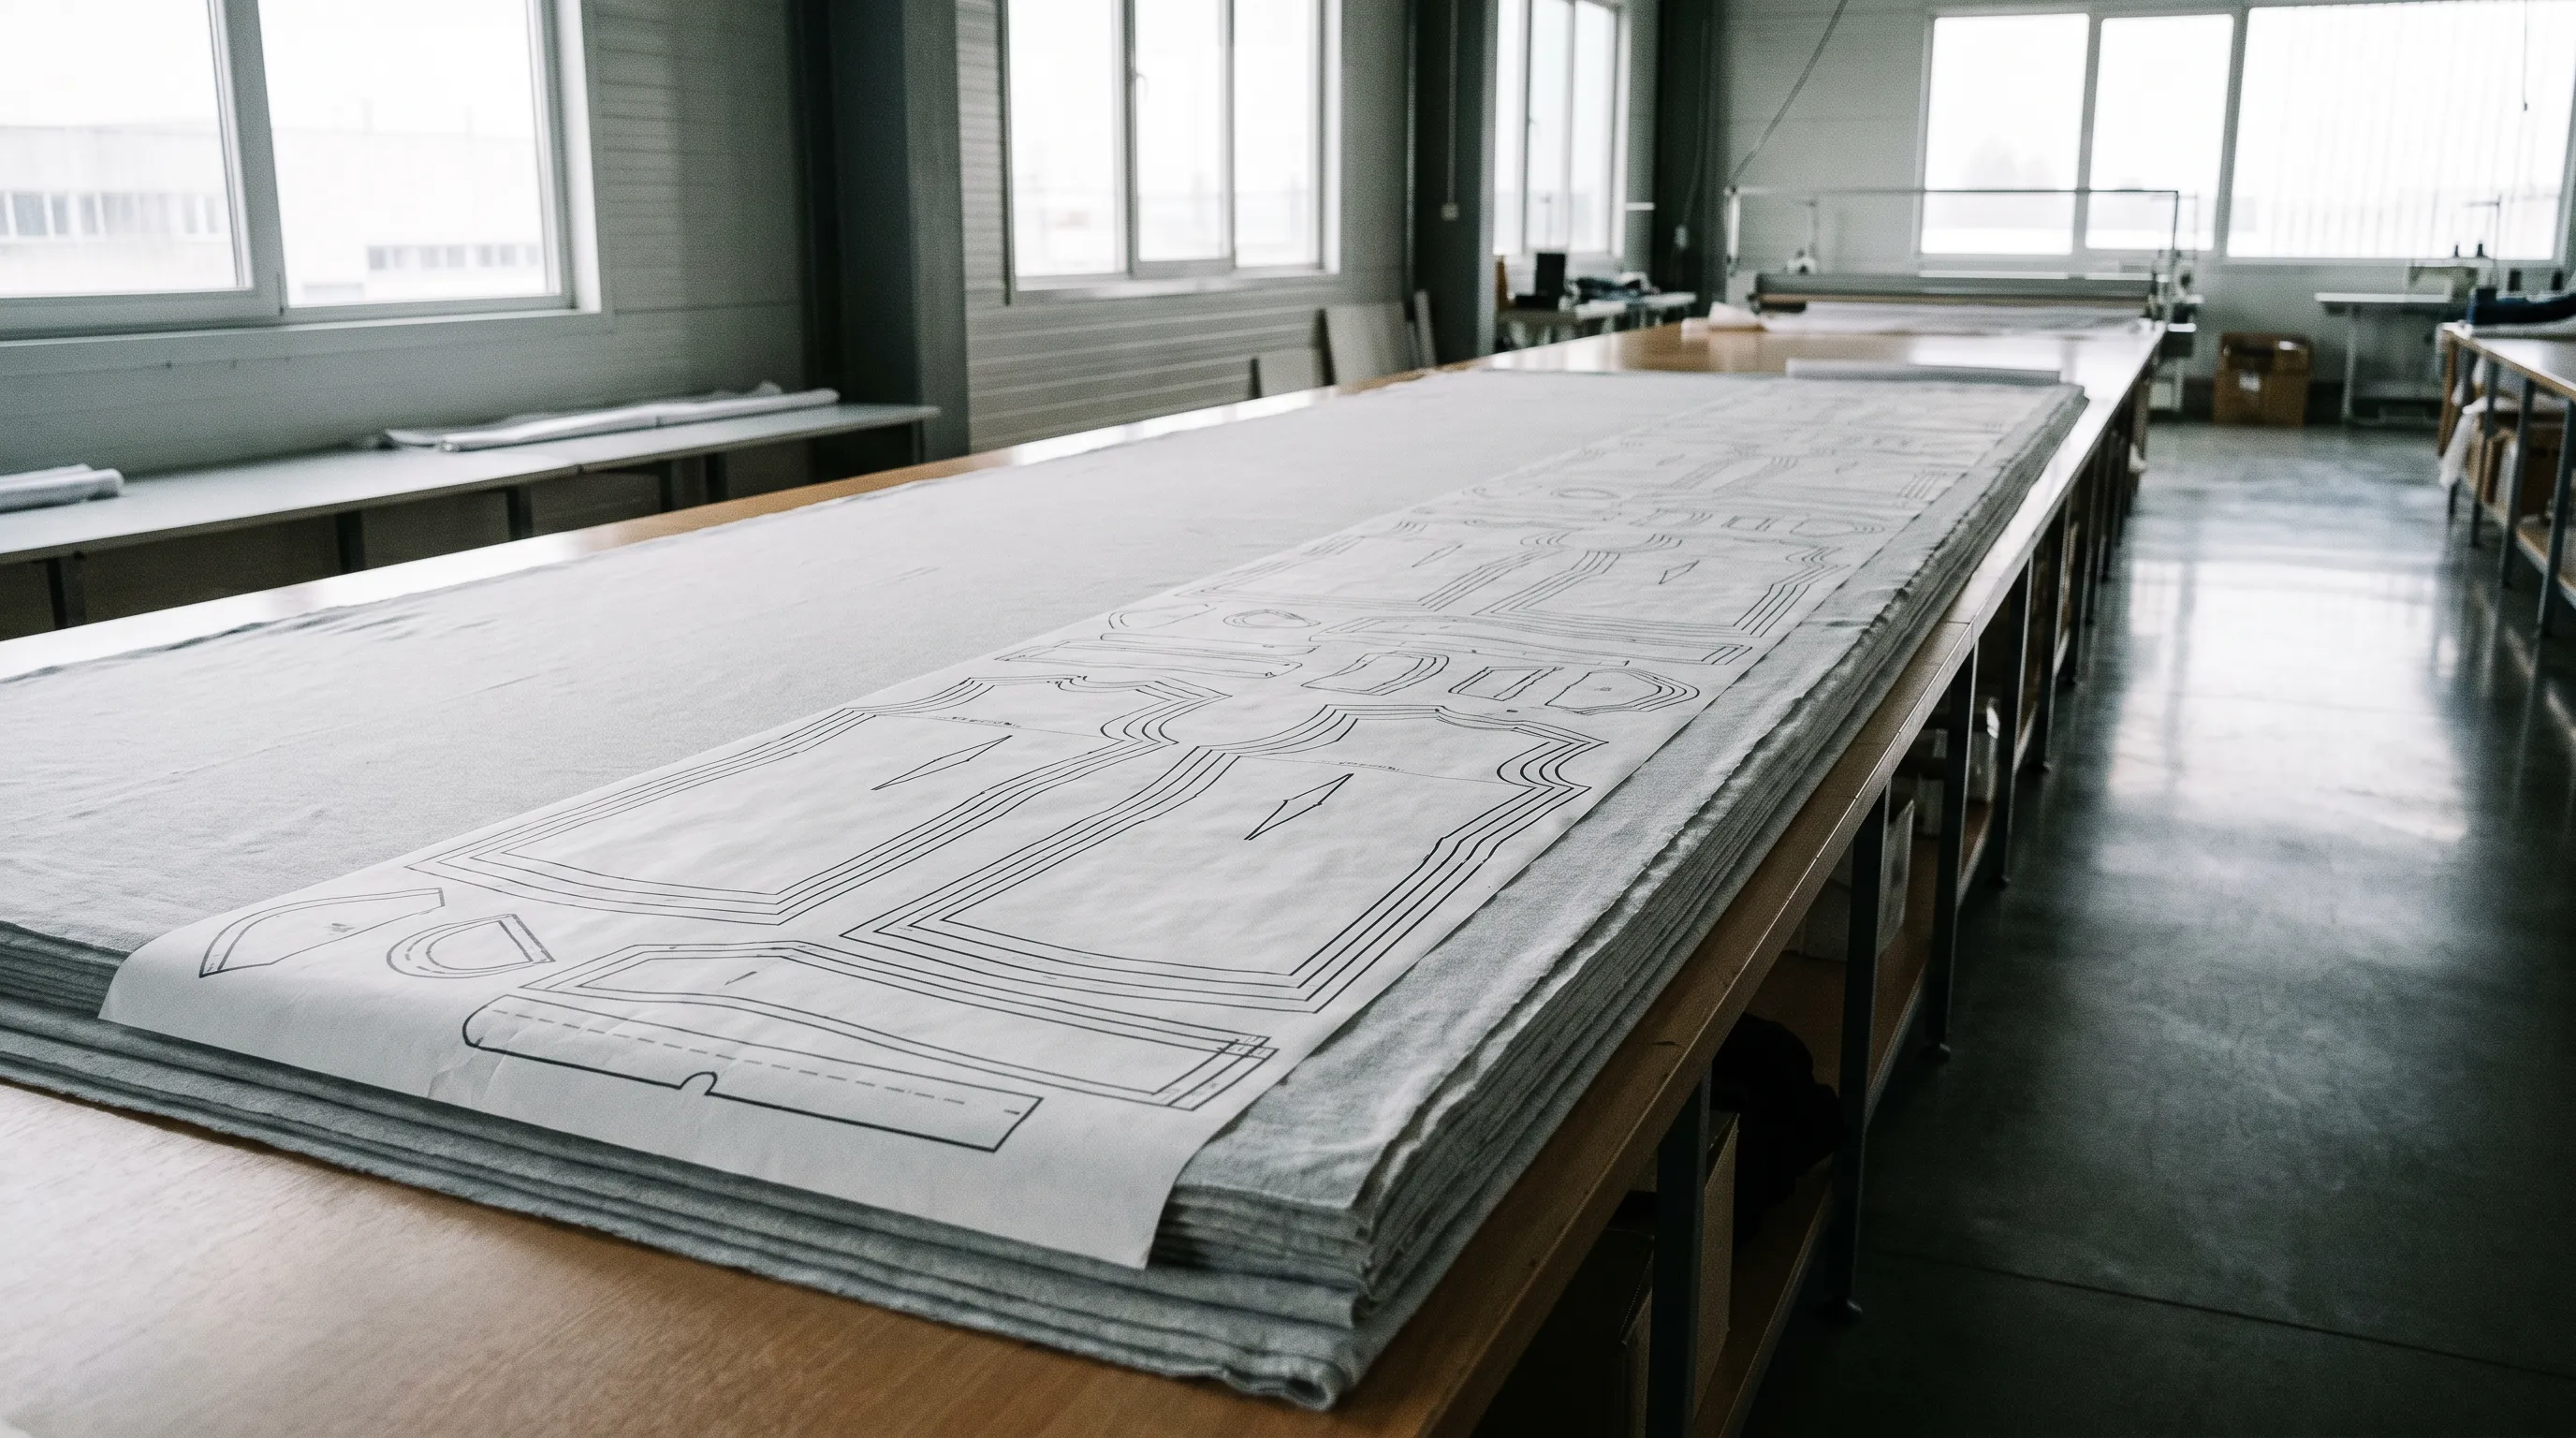
A marker is a precise, full-scale layout diagram that arranges every pattern piece for a style — across one or more sizes — onto the width of the fabric to be cut. Marker making is the process of nesting those pieces to use as little fabric as possible. The key metric is marker efficiency: the percentage of the marker's area actually occupied by pattern pieces, typically 80–90% in apparel. Because fabric is 40–70% of garment cost, a few points of marker efficiency move the unit price.
What is a marker?
A marker is a full-scale diagram showing the precise arrangement of all the pattern pieces of a garment — for one size, or a mix of sizes — laid out across the width of the fabric that will be cut (Online Clothing Study). Think of it as the cutting blueprint: before a single layer of cloth is sliced, the marker fixes exactly where each front, back, sleeve, collar, and facing will sit.
Marker making is the process of working out that arrangement — nesting the pieces as tightly as possible to use the least fabric while respecting every rule the fabric imposes (Uphance). It is the layout-planning stage that sits between an approved tech pack and the cutting table, and it is where fabric cost is largely decided.
How it's used: the finished marker is printed full-size on paper and laid on top of a spread — many layers of fabric stacked on a long table — or projected by the cutting machine. The cutter then follows the marker outlines through all the stacked layers at once, so one well-planned marker controls the fabric consumption of every garment in that cut. Because the marker governs how much cloth each garment eats, it is the single biggest lever on material yield in the whole factory.
The marker also fixes the marker length — how far down the fabric roll the layout runs — which, multiplied by the number of layers in the spread, tells planners exactly how much fabric the order will consume before a meter is unrolled. That makes the marker not just a cutting guide but the basis of the fabric purchase order: a tighter marker means a shorter length, fewer meters bought, and a lower landed cost per garment (Apparel Resources).
Marker efficiency: the number that matters
The quality of a marker is measured by marker efficiency — the ratio of the area occupied by pattern pieces to the total area of the marker, expressed as a percentage (Online Clothing Study):
Marker efficiency (%) = (total area of pattern pieces ÷ total area of the marker) × 100
The gap up to 100% is waste — the fabric inside the marker rectangle that no pattern piece covers, lost in the awkward gaps between curved edges. A marker at 88% efficiency means 12% of the cloth inside it is scrap before the knife even moves.
In apparel, efficiency above 80–85% is considered good, and CAD systems typically deliver 85–92% on woven garments (Textile Learner). The achievable ceiling depends on piece shape and placement rules: simple rectangular pieces nest beautifully, while bias-cut skirts, curved or oddly shaped panels, and stripe- or plaid-matching all force lower efficiency. The number is never 100% because human bodies — and the pattern pieces that cover them — are not rectangles.
Why obsess over a few percentage points? Because fabric is 40–70% of a garment's cost (Apparel Resources). Pushing a marker from 82% to 88% on a high-volume style trims material spend on every unit, every cut, indefinitely — which is why factories treat marker efficiency as a tracked production metric, not a one-off.
There are two ways to compute it. The area method — pattern-piece area over total marker area — is what CAD software reports automatically, because the program already knows every piece's exact surface area. The weight method — weight of fabric consumed by the pattern pieces over the total weight of fabric under the marker — is the manual workaround, used when surface area can't be measured directly off paper pieces (Online Clothing Study). Both express the same idea: how much of the cloth you paid for ends up in the garment versus the bin.
Worked example
What two efficiency points are worth on 5,000 tees
You're cutting 5,000 t-shirts. Each tee needs about 1.5 m of 180 GSM jersey at the marker's efficiency, and the fabric costs $5.00/m. At 82% marker efficiency, real consumption per tee climbs to roughly 1.83 m (1.5 ÷ 0.82), so 5,000 tees take ≈9,150 m = $45,750 in fabric. Re-nest the same pieces to 88% efficiency and per-tee consumption drops to about 1.70 m (1.5 ÷ 0.88), or ≈8,520 m = $42,600. That six-point gain saves ≈$3,150 on one cut order — and it repeats on every reorder. The marker is also why fabric utilization is planned alongside the cut order: combining sizes into one mixed marker (say two M's, one S, one L) usually nests tighter than cutting each size on its own.

Manual vs CAD marker making
Markers can be planned by hand on full-size paper or generated in pattern-CAD software. CAD dominates modern factories, but skilled manual marking still has a place in small shops and sampling.
| Aspect | Manual marker | CAD marker |
|---|---|---|
| How it's made | Mini pattern pieces or full-size patterns arranged by hand and traced on paper | Digitized pattern pieces nested on screen; auto- or interactive-nesting |
| Typical efficiency | Good in expert hands, but harder to optimize and measure | Commonly 85–92% on wovens; efficiency reported live |
| Efficiency feedback | Area measured manually (e.g. with a planimeter) — slow and approximate | Calculated instantly from digital piece areas |
| Speed & repeatability | Slow; each marker re-drawn; hard to reproduce exactly | Fast; markers saved, edited, and re-output identically |
| Best for | Small shops, one-offs, sampling, very experienced marker makers | Production volumes, multi-size cut orders, plotter/auto-cutter integration |
Computerised marker making generally beats manual on speed, repeatability, and measurable efficiency — though a highly experienced marker maker can still nest a good manual marker. Sources: Textile Learner, Online Clothing Study.
How marker efficiency is calculated

What constrains a marker (and why it's never 100%)
A marker maker can't just slam pieces together — several hard rules cap how tight the nest can get (Textile Learner):
Grainline. Each piece's grainline must run parallel to the fabric selvedge, or the garment will twist, sag, and drape wrong. You can't rotate a piece freely to fill a gap — only flip or slide it along the grain.
Nap and direction. On directional fabrics — corduroy, velvet, prints with an up/down — every piece in a garment must point the same way (nap-up or nap-down), or panels read as different shades. This forces a one-way layout that wastes more than a nap-either-way marker on plain cloth.
Pattern matching. Stripes, plaids, and engineered prints have to line up across seams, which pins pieces to specific positions and drops efficiency further.
Fabric width and form. Wider fabric generally nests better (more room to interlock pieces). Flat, open-width goods use an open marker with full pieces; tubular knits use a closed marker with half-pieces placed on the fold. The cutting blade also needs a sliver of clearance between pieces, so they can't quite touch.
Because human-shaped pattern pieces leave curved gaps, 100% is impossible — the job is getting as close to the practical ceiling as the fabric and design allow.
Common marker mistakes — and what a marker is NOT
A marker is NOT a pattern, and NOT a tech pack. The pattern is the set of individual piece shapes; the marker is how those shapes are arranged on the fabric. The tech pack is the upstream spec document; the marker is a downstream cutting-room output built from the pattern inside it. Confusing the three leads to briefs that omit the cutting instructions a factory actually needs.
Treating efficiency as the only goal. Squeezing the last 1% by ignoring grainline or nap saves cloth and ruins garments. Efficiency is bounded by quality rules, not a free maximization.
Forgetting the size ratio. A marker mixing the wrong size proportions cuts garments you can't sell. Markers are planned against the cut order — the real size breakdown of the order — and mixed-size markers usually nest tighter than single-size ones.
Ignoring fabric faults and shrinkage. Real cloth has flaws and shrinks after finishing; markers and spreads carry an allowance (cut-and-sew waste commonly runs 10–15% on top of the marker) so the final garments hit spec (Athleisure Basics).
Marking from an incomplete spec. A factory can only nest pieces it has correct, fully graded patterns for. If your grade rules and points of measure are vague, the patterns are wrong and so is the marker. Getting the upstream spec right — flats, a complete BOM, correct fabric weight, and graded measurements — is what lets the cutting room plan a clean marker. Adstronaut's Tech Pack Generator produces that factory-ready spec from a single garment photo, so the patterns the marker is built from start accurate.
Frequently asked questions
What is a marker in garment manufacturing?
A marker is a full-scale diagram that arranges all of a garment's pattern pieces — for one size or a mix of sizes — across the width of the fabric to be cut. It's the cutting-room blueprint: the cutter follows the marker outlines through a stacked spread of fabric so one layout controls the fabric consumption of every garment in the cut.
What is marker making?
Marker making is the process of working out the most efficient layout of a style's pattern pieces on the fabric, nesting them as tightly as possible to use the least cloth while respecting grainline, nap, pattern-matching, and fabric width. It happens between an approved tech pack and the cutting table, and it largely decides a garment's fabric cost.
What is marker efficiency and how is it calculated?
Marker efficiency is the percentage of a marker's total area that's actually covered by pattern pieces. Formula: (total area of pattern pieces ÷ total area of the marker) × 100. An 88% marker means 12% of the cloth inside it is waste before cutting. In apparel, above 80–85% is considered good.
What is a good marker efficiency percentage?
Above 80–85% is generally considered good in apparel, and CAD systems commonly reach 85–92% on woven garments. The achievable ceiling depends on piece shape and placement rules — bias cuts, curved panels, and stripe or plaid matching all lower it. 100% is impossible because human-shaped pattern pieces leave curved gaps.
Why does marker efficiency matter so much?
Because fabric is roughly 40–70% of a garment's cost, the marker is the biggest single lever on material yield. Moving a high-volume style from 82% to 88% efficiency trims fabric spend on every unit and repeats on every reorder, so factories track marker efficiency as a standing production metric.
What is the difference between a manual marker and a CAD marker?
A manual marker is arranged and traced by hand on paper; a CAD marker is nested in pattern software that reports efficiency live and outputs to a plotter or auto-cutter. CAD wins on speed, repeatability, and measurable efficiency (commonly 85–92% on wovens), though a very experienced marker maker can still nest a good manual marker for small runs and sampling.
Why can't a marker reach 100% efficiency?
Because pattern pieces are shaped to fit human bodies, not to tessellate. Curved and irregular edges leave unavoidable gaps, and constraints like grainline (pieces must align to the selvedge), one-way nap on directional fabric, stripe/plaid matching, and blade clearance all prevent a perfectly tight nest. The goal is approaching the practical ceiling the fabric and design allow.
What constraints limit how tight a marker can be?
Grainline (each piece must run parallel to the selvedge), nap direction (all pieces of a garment must point the same way on corduroy, velvet, or directional prints), pattern matching across seams for stripes and plaids, fabric width and form (open markers for flat goods, closed markers on the fold for tubular knits), and a small blade-clearance gap between pieces.
How does the marker relate to the cut order and the lay?
Cut order planning decides which sizes go into which markers to balance efficiency against the order's size ratio — mixed-size markers usually nest tighter than single-size ones. The lay (or spread) is the stack of fabric layers placed under the printed marker, so the cutter slices all layers at once and the marker's efficiency multiplies across the whole stack.
Is a marker the same as a pattern or a tech pack?
No. The pattern is the set of individual piece shapes; the marker is how those shapes are arranged on the fabric for cutting; the tech pack is the upstream specification document. The marker is a downstream cutting-room output built from the graded pattern, which in turn comes from the tech pack.
Start the cutting room with an accurate spec
A clean marker depends on correct, fully graded patterns — which depend on a complete tech pack. Turn one garment photo into a factory-ready pack with flats, a structured BOM, and graded points of measure in minutes. First pack free, then $3–6.
Try the AI Tech Pack GeneratorRelated reading
Sources and further reading
- Online Clothing Study — what is a marker & marker efficiency — marker and marker-making definitions, efficiency formula
- Textile Learner — marker making, efficiency & CAD — 80–85% good, CAD 85–92% on wovens, manual vs CAD
- Textile Learner — constraints of marker making — grainline, nap, width, open vs closed markers, blade clearance
- Apparel Resources — fabric utilization & cut order planning — fabric 40–70% of garment cost, efficiency as tracked metric
- Uphance — what is marker making — marker-making layout-planning definition and purpose
- Athleisure Basics — garment production cost (2026) — cut-and-sew waste/buffer commonly 10–15%